❖目录
- 1.postman 功能简介 ➥
- 2.Postman APP介绍 ➥
- 3.Postman 安装 ➥
- 4.设置代理-监听本机浏览器与手机网络请求➥
- 5.如何配置HTTPS证书?➥
- 6.测试api集合 ➥
- 7.Postman 环境变量与cookie ➥
- 8.脚本执行 ➥
- 示例:用环境变量实现简单的链式请求
- 示例:用断言判断api的返回数据是否正确
- 其他常用语法
- 9.团队协作与导入导出 ➥
- 10.postman命令行自动化测试 ➥
1.postman功能简介⇡
Postman是一款功能强大的HTTP调试与模拟插件。使用于API/接口功能测试工具,号称接口测试神器。软件可以很方便的塞数据,查看响应,设置检查点/断言,能进行一定程度上的自动化测试,但是不要指望Postman能代替你进行性能测试,一次批量执行太多太久的话容易崩溃掉。postman适用于不同的操作系统,还支持postman 浏览器扩展程序、postman chrome应用程序等。它可以利用Chrome插件的形式把各种模拟用户HTTP请求的数据发送到服务器,以便开发人员能够及时地作出正确的响应,或者是对产品发布之前的错误信息提前处理,进而保证产品上线之后的稳定性和安全性
官方doc文档-https://learning.getpostman.com/docs/postman/launching_postman/installation_and_updates
2.Postman APP介绍⇡
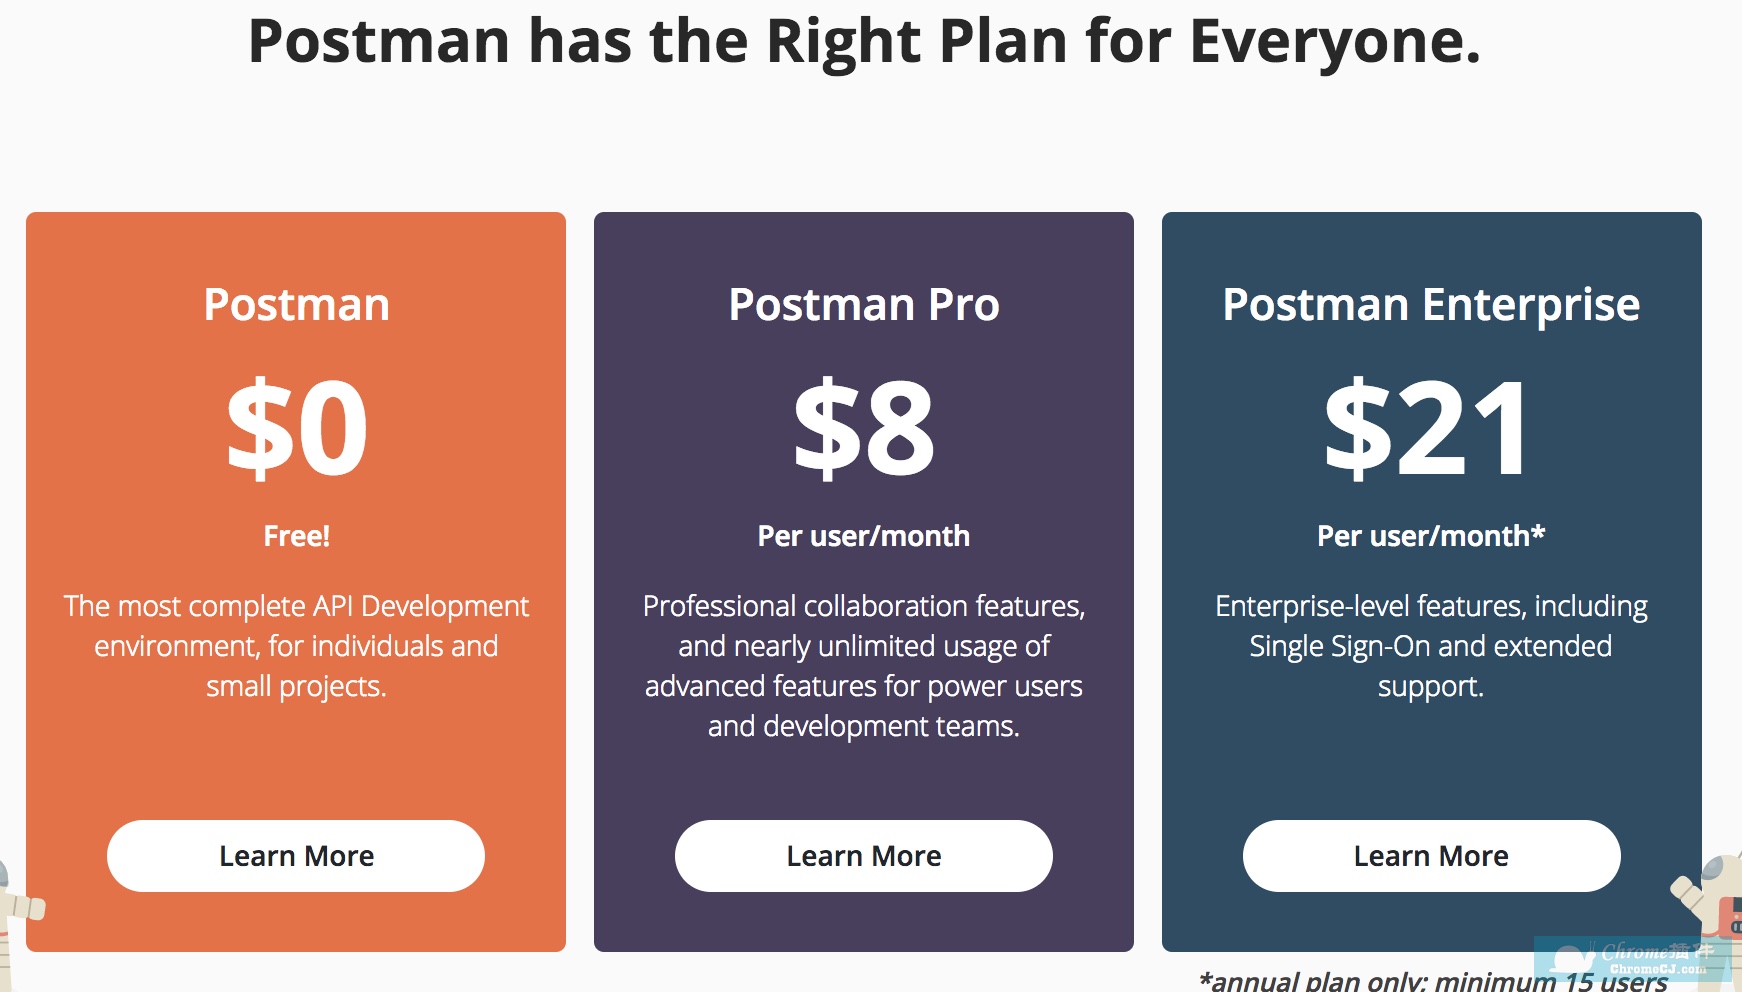
1.Postman是一款非常优秀的调试工具,非常适合开发人员去使用。Postman官方不仅提供免费版本,还提供两款收费版本如下:
至于postman for mac的安装方法,熟悉mac操作的朋友自然不必多说。一旦你下载了应用程序,你可以拖动文件到“应用程序”文件夹。 双击psotman打开应用程序。Postman for Mac版更快,更容易的API开发!一个强大的GUI平台,可以通过测试,文档和共享来构建API请求,从而使您的API开发更快,更轻松
于2018年初chrome停止对chrome应用程序的支持,你的postman可能无法正常使用了。目前chrome应用商店能使用的就是chrome扩展程序和主题背景。
如果你还想用postman,那么可以使用下面官方推出的Postman APP版本。
3.Postman安装⇡
Postman官网下载地址:https://www.getpostman.com/apps 因为google暂时下架Postman插件
这里的介绍是桌面版 下载适用于自己系统的桌面版
安装前需要用node.js环境 (Node 是一个让 JavaScript 运行在服务端的开发平台)
newman是Postman的命令行管理器。可以用命令行轻松地运行和测试Postman
- node.js下载 https://nodejs.org/en/
npm -v //检查是否安装成功
安装newman
sudo npm install -g newman
newman -v //检查是否安装成功
npm install -g newman-reporter-html 用来生成报告用的
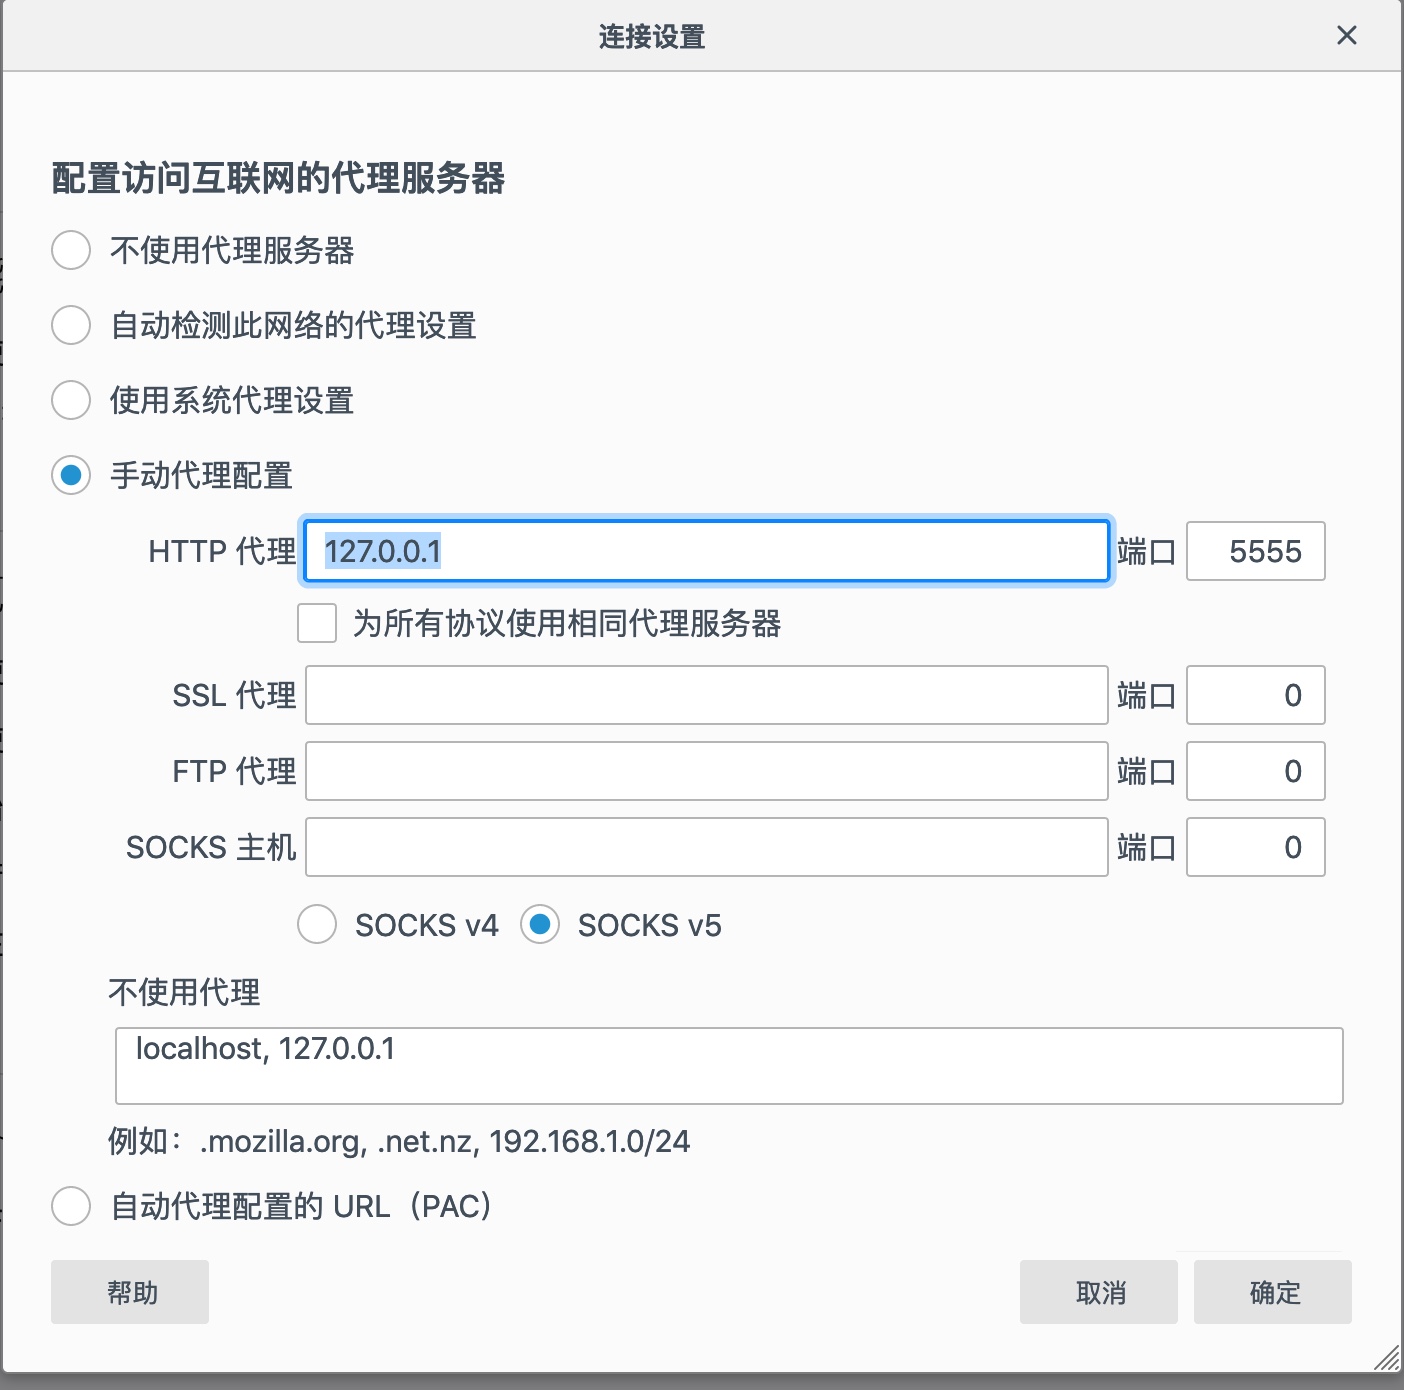
4.设置本地代理监听电脑-手机⇡
*1.火狐浏览器设置代理
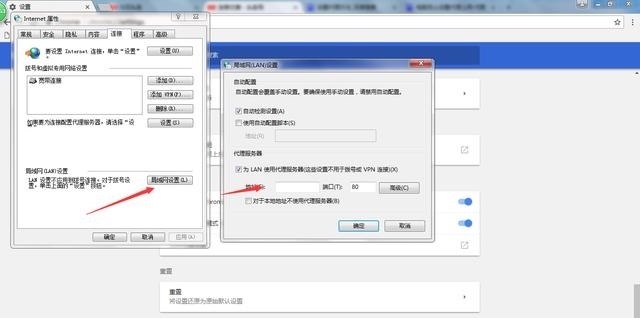
点击浏览器右上角菜单栏->"选项"->"常规"->"网络设置"->"手动代理设置"->"Http代理"
也可以直接在浏览器里 输入about:preferences
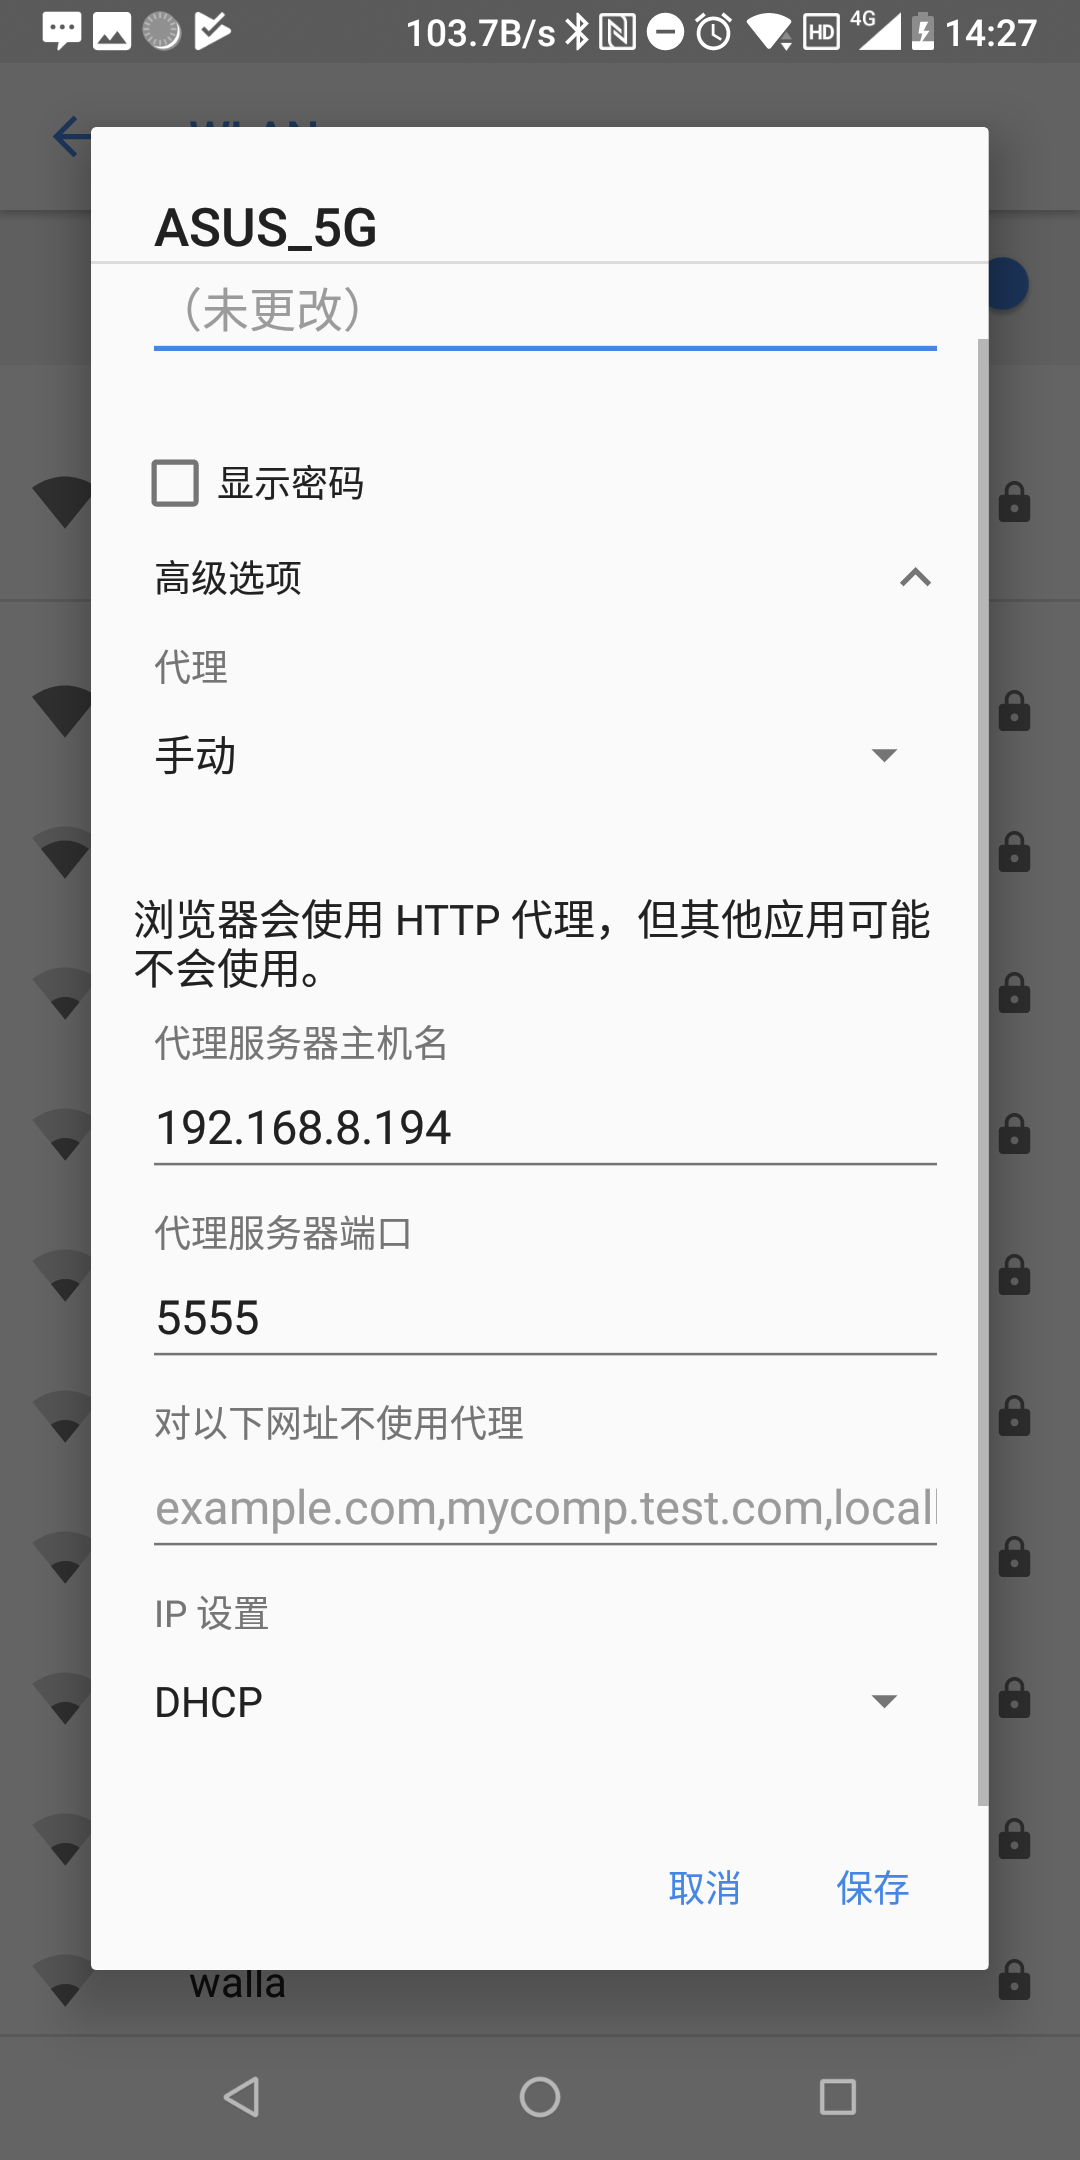
->地址 127.0.0.1 端口5555 (自定义端口)
2.谷歌浏览器
点击浏览器右上角菜单栏->"设置"->"高级"->"系统"->"打开代理"
也可以直接在浏览器里输入chrome://settings/
->"Http代理"->地址 127.0.0.1 端口5555 (自定义端口)
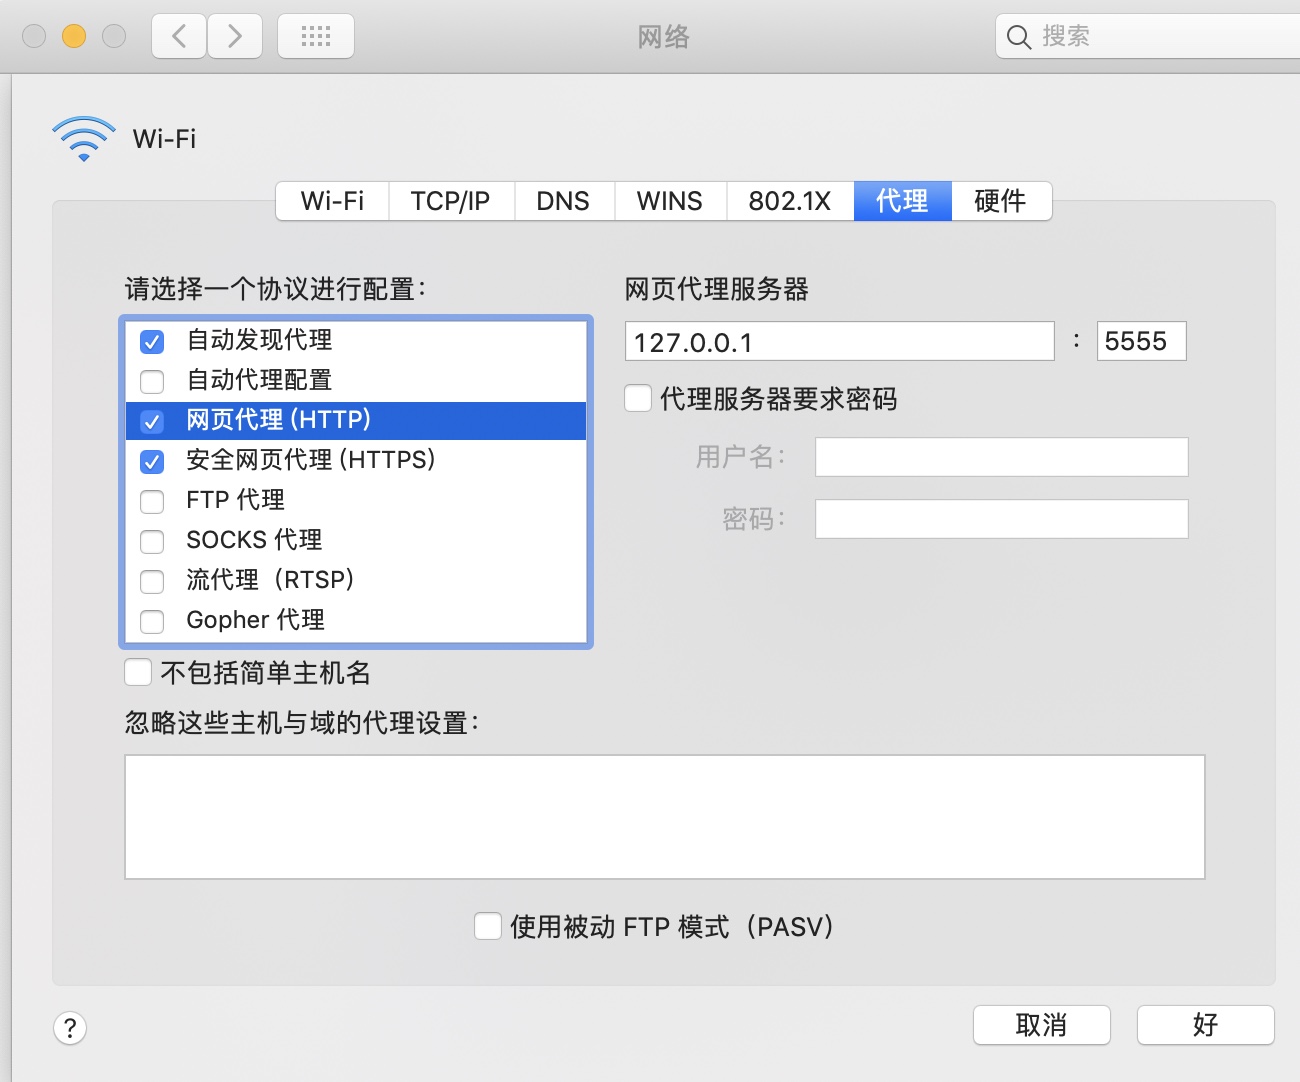
3.mac系统 打开网络设置 点击当前网络 点击"高级" 修改代理
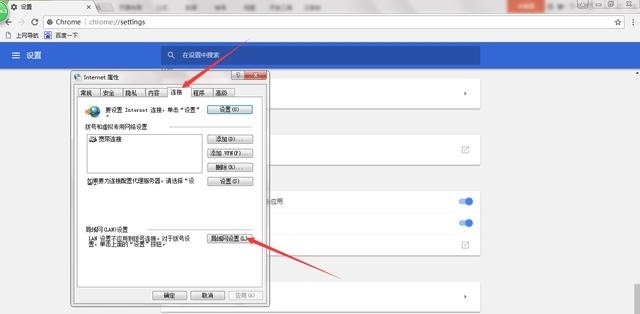
4.window系统 右键Intent属性
5.手机系统 android 为例 长按当前连接的wifi
(注意不同手机操作方式不同 有的手机是直接点击 有的是点击wifi旁边的info图标)
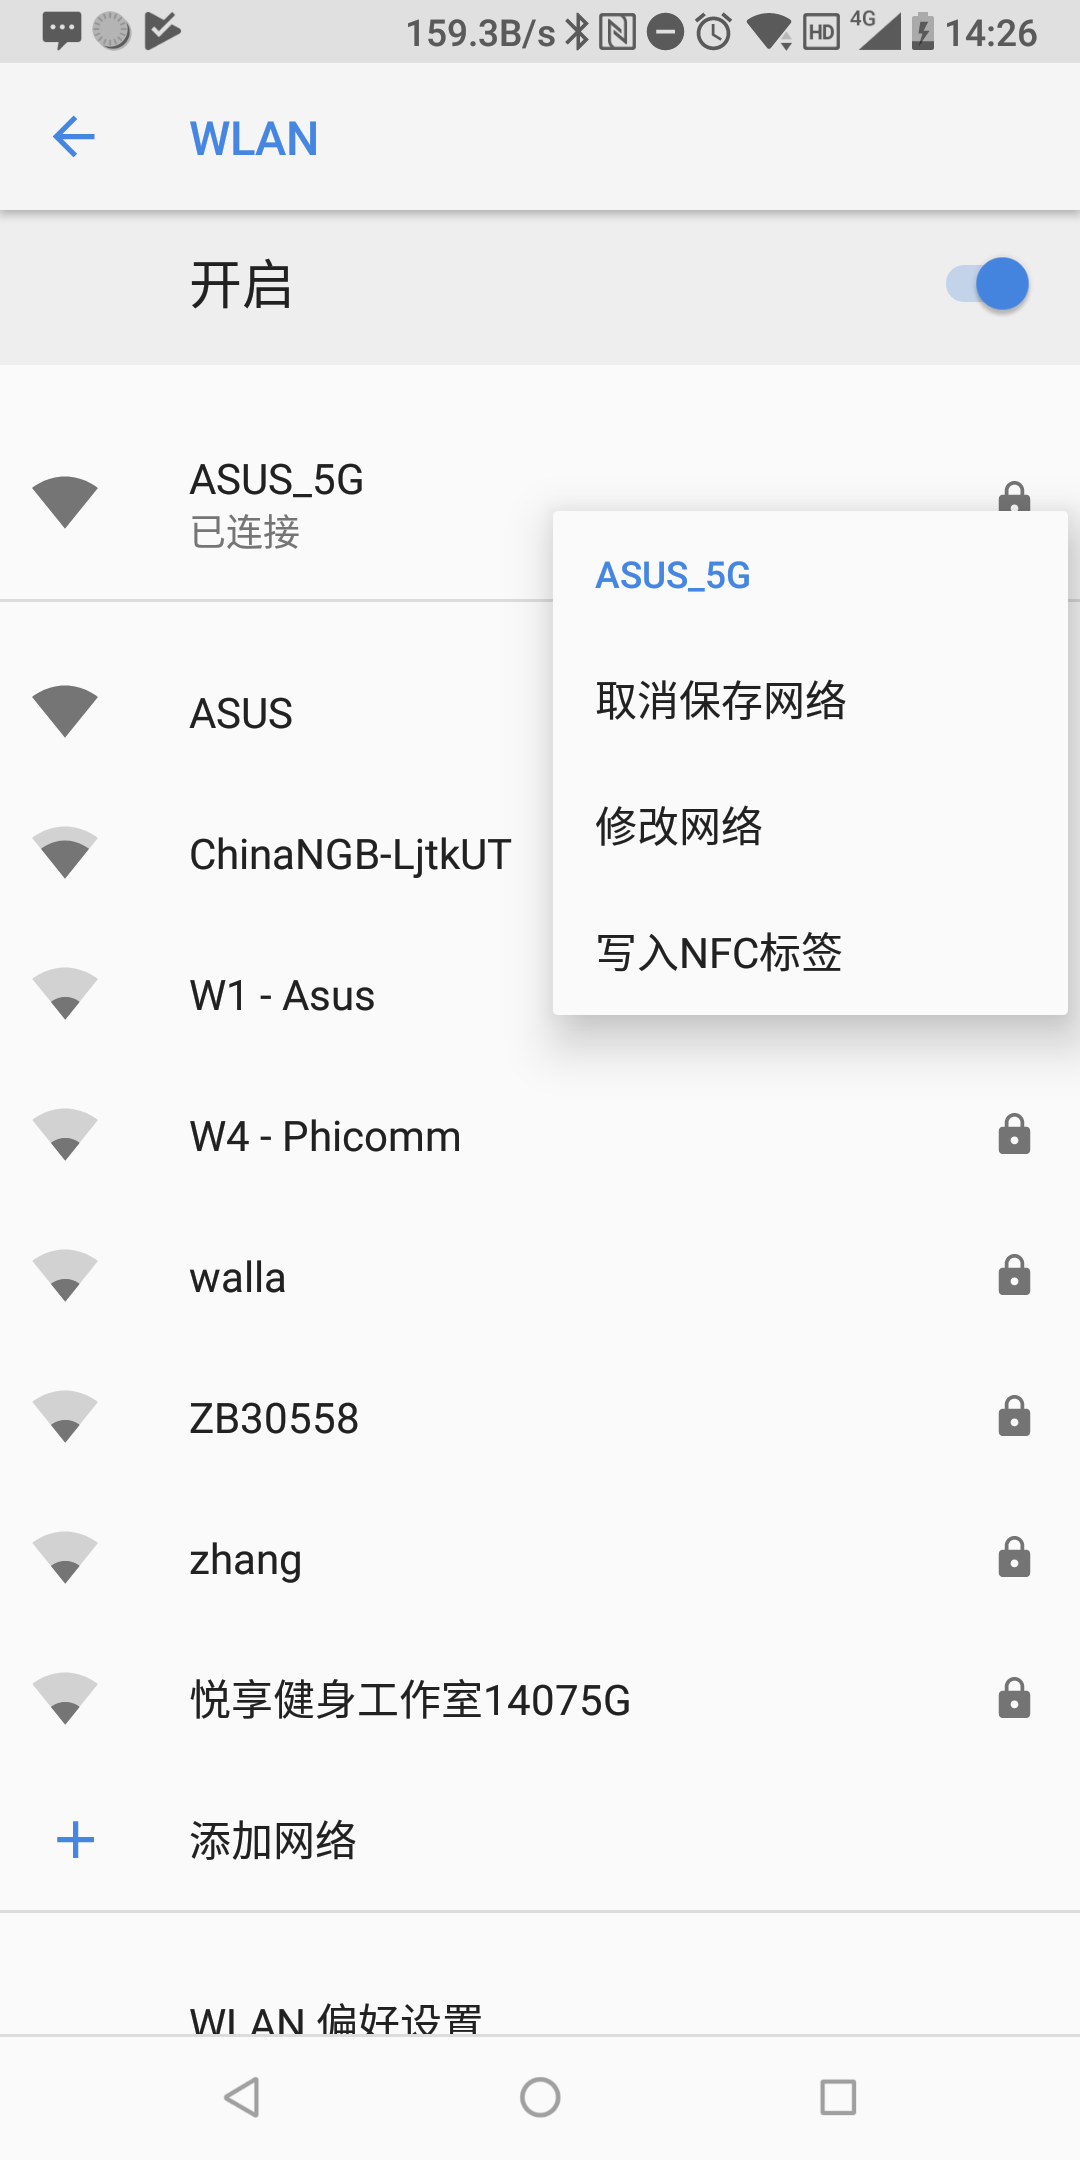
输入电脑上局域网的IP地址
6.点击软件上面的雷达图标
选择port端口为5555 选择一个Collection数据记录组(默认集合是history,你可以新建和自定义采集)下图是helloword,点击Connent完成配置
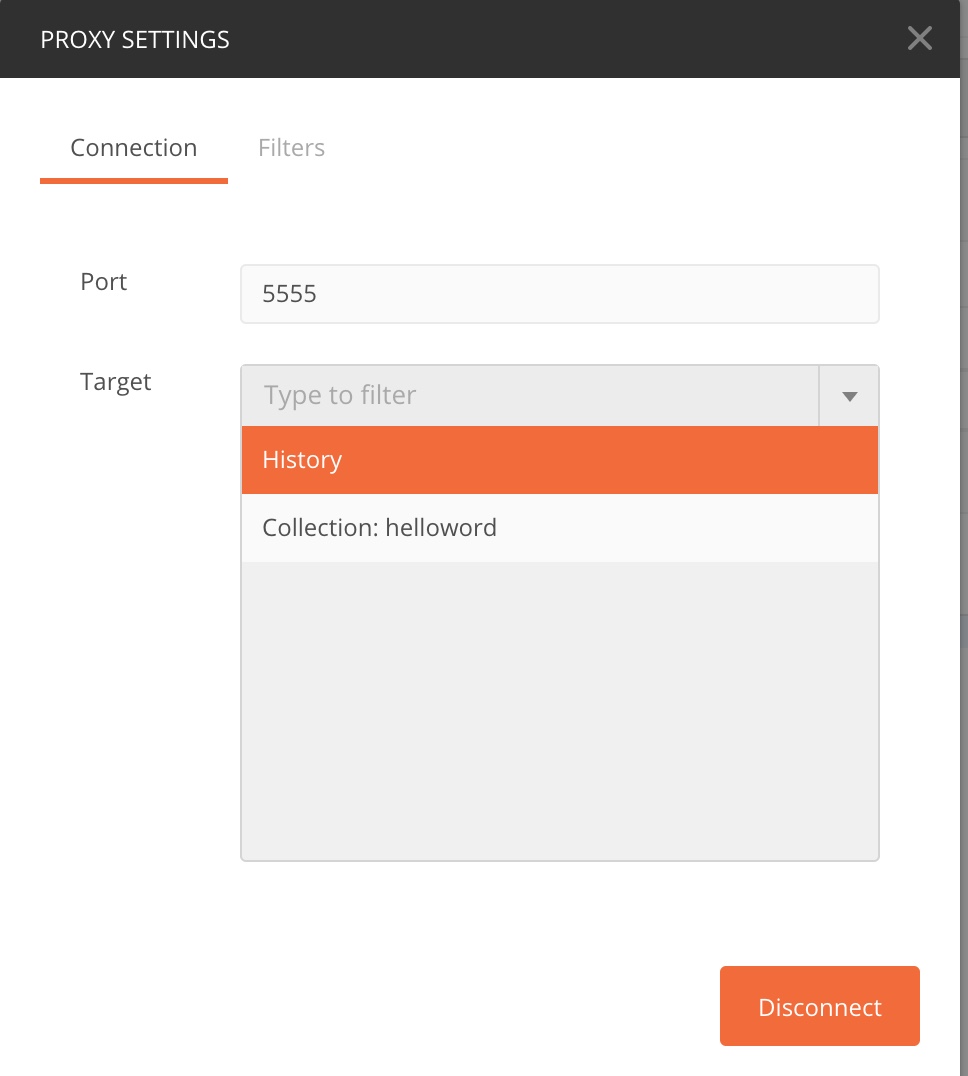
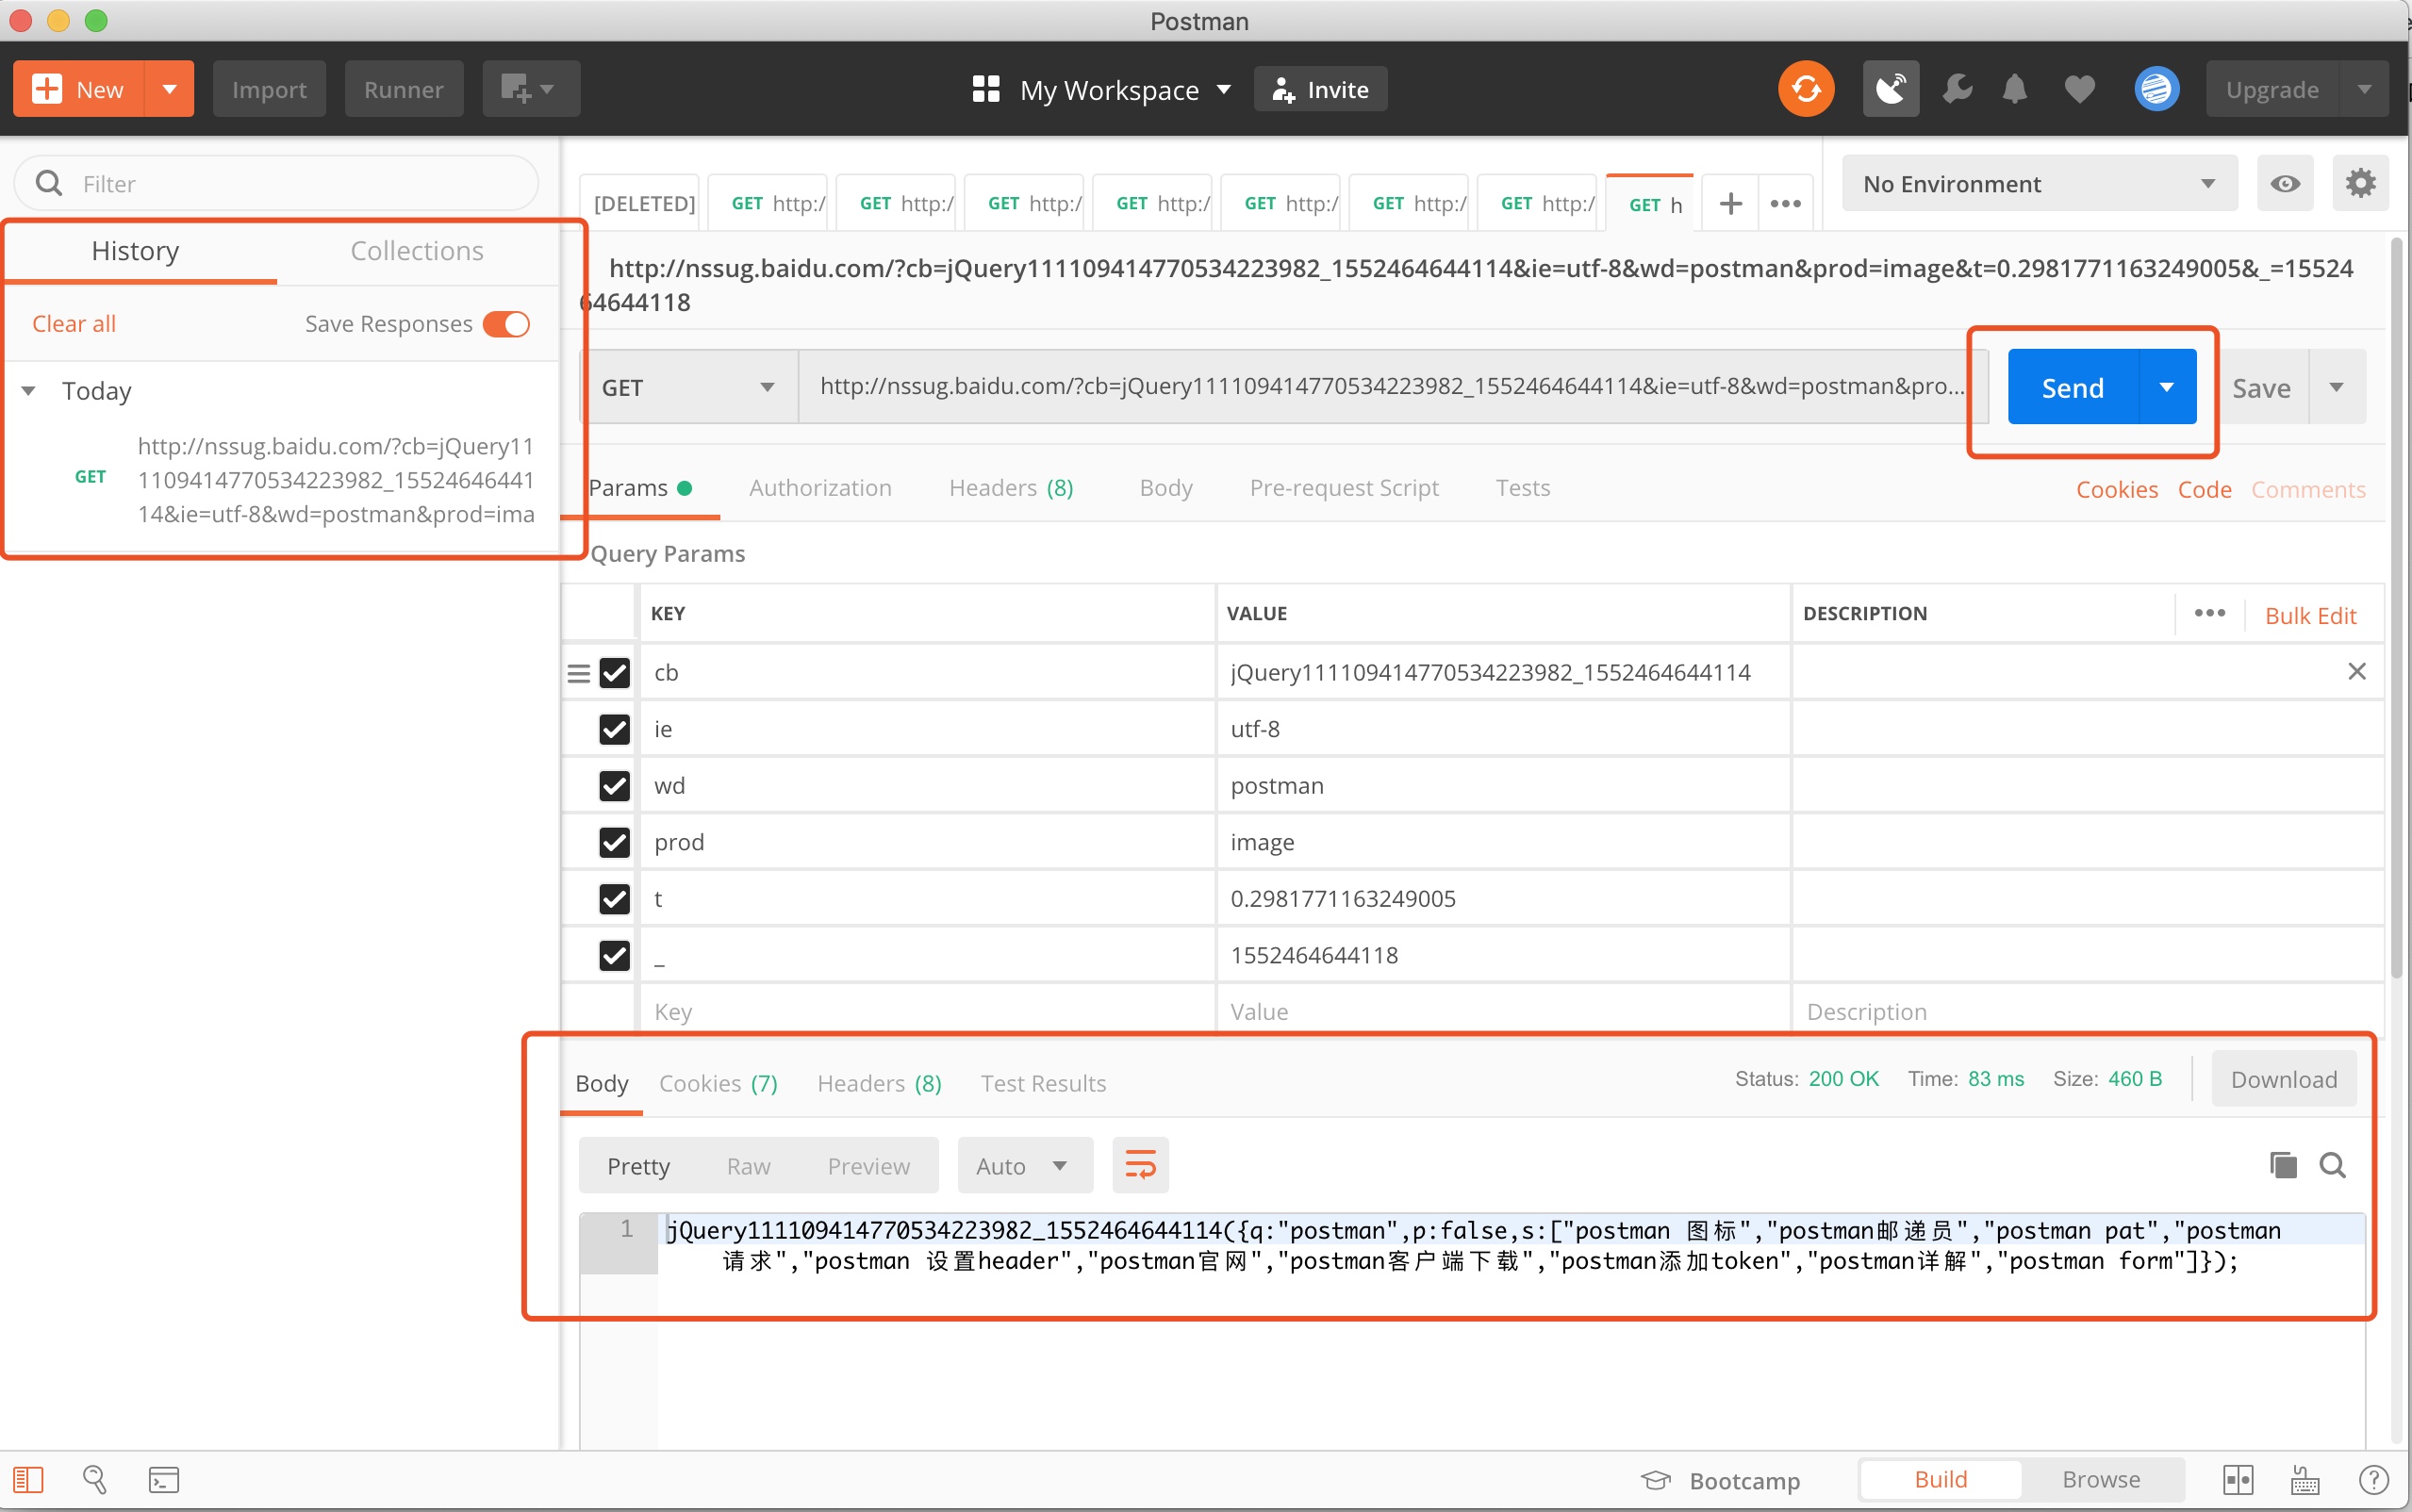
测试:我们在在浏览器里输入http://nssug.baidu.com/?cb=jQuery111109414770534223982_1552464644114&ie=utf-8&wd=postman&prod=image&t=0.2981771163249005&_=1552464644118 手机同理
你就可以在 postman看到这条响应记录了 通过代理我们就可以方便查看各种日志了
注意如果没有收到消息可以尝试关闭再重启网络 https的请求需要配置证书
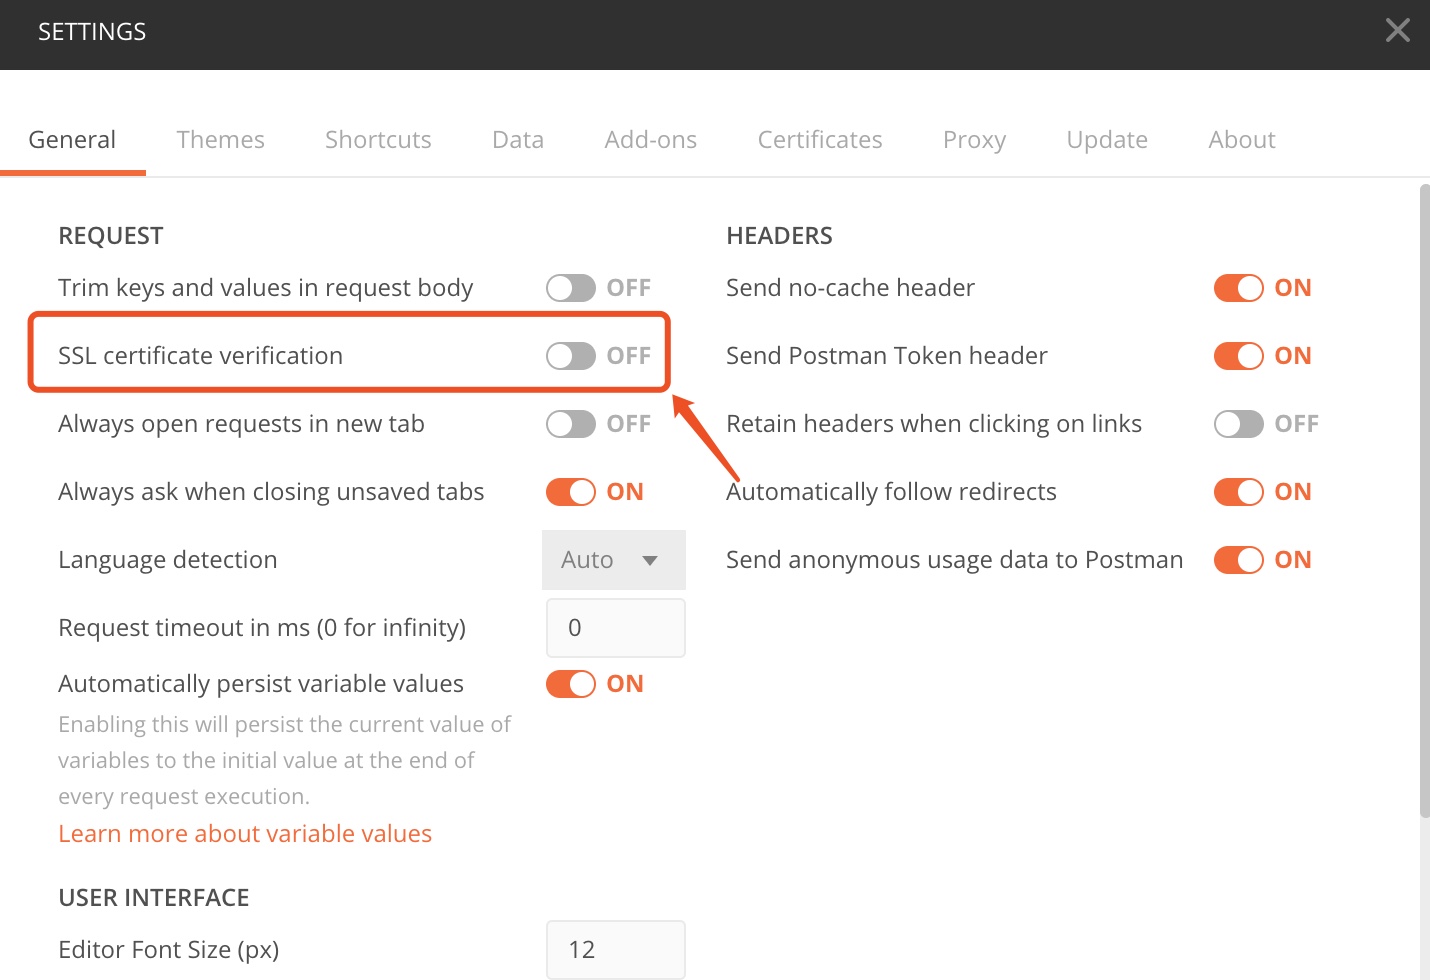
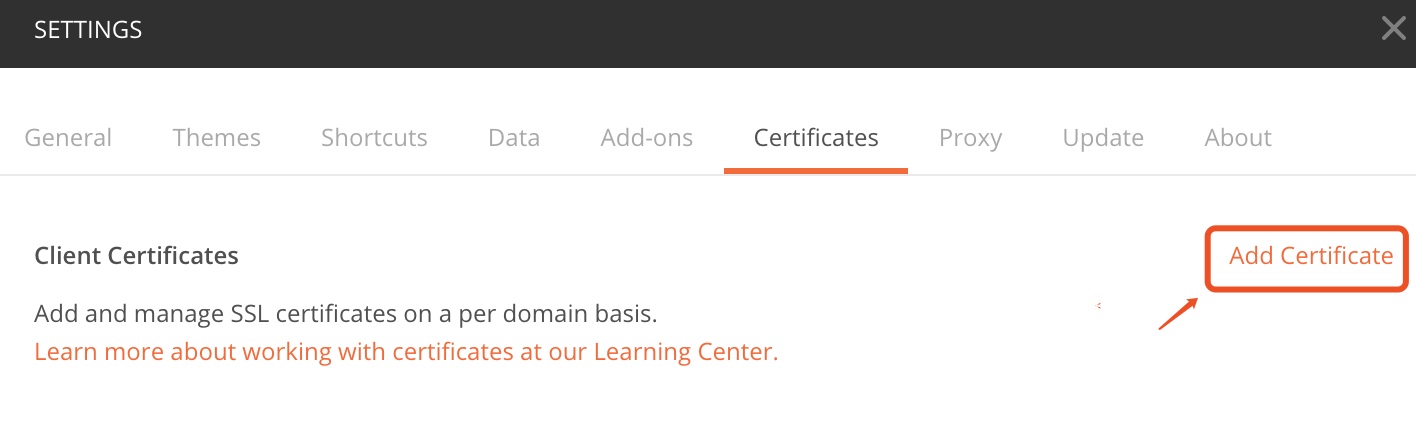
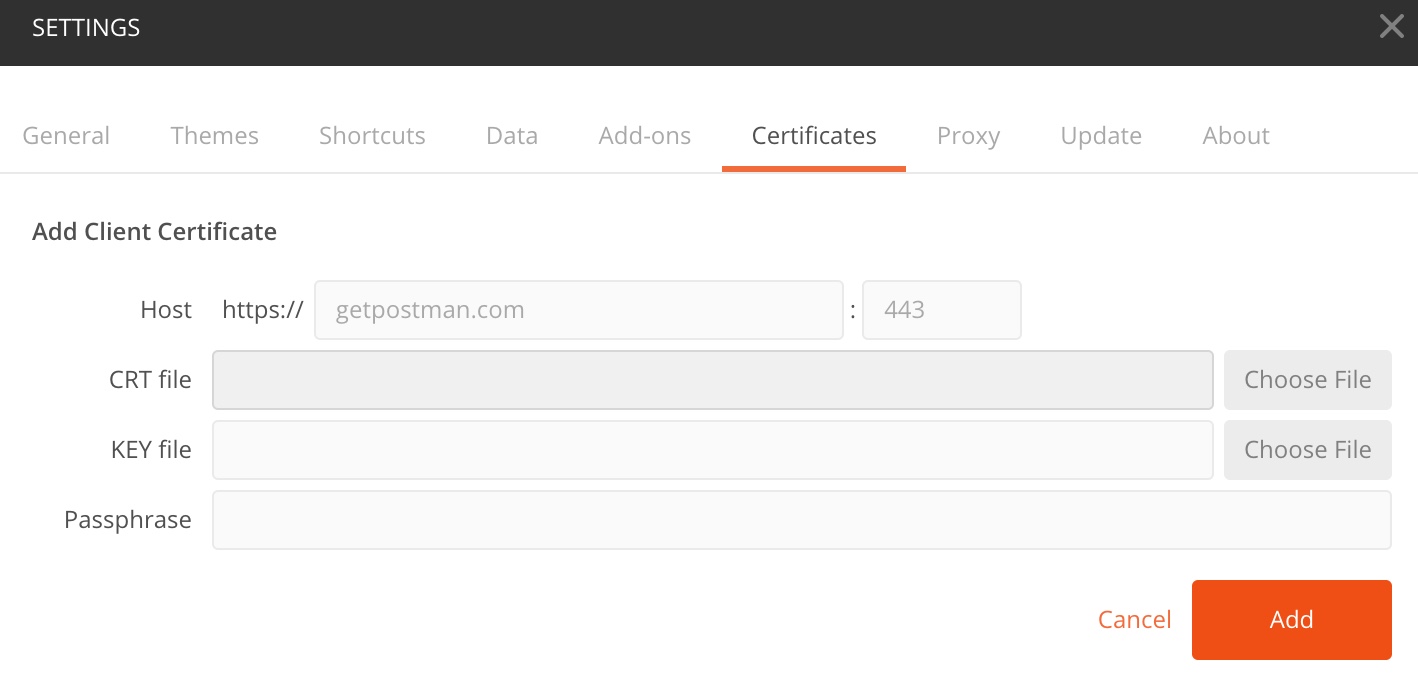
5.如何配置HTTPS证书⇡
- 点击程序主菜单小扳手
- 点击general常规 关闭SSL校验
- 点击certificate选项卡 点击添加
- 导入.crt文件和.key文件. 点击Add添加成功
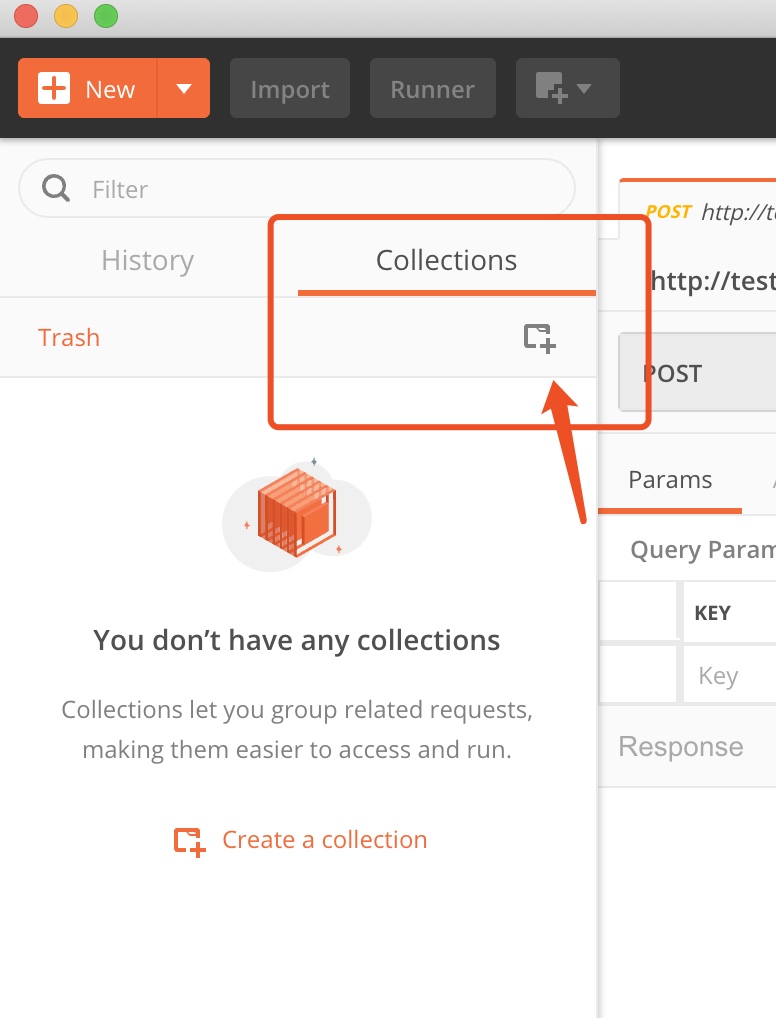
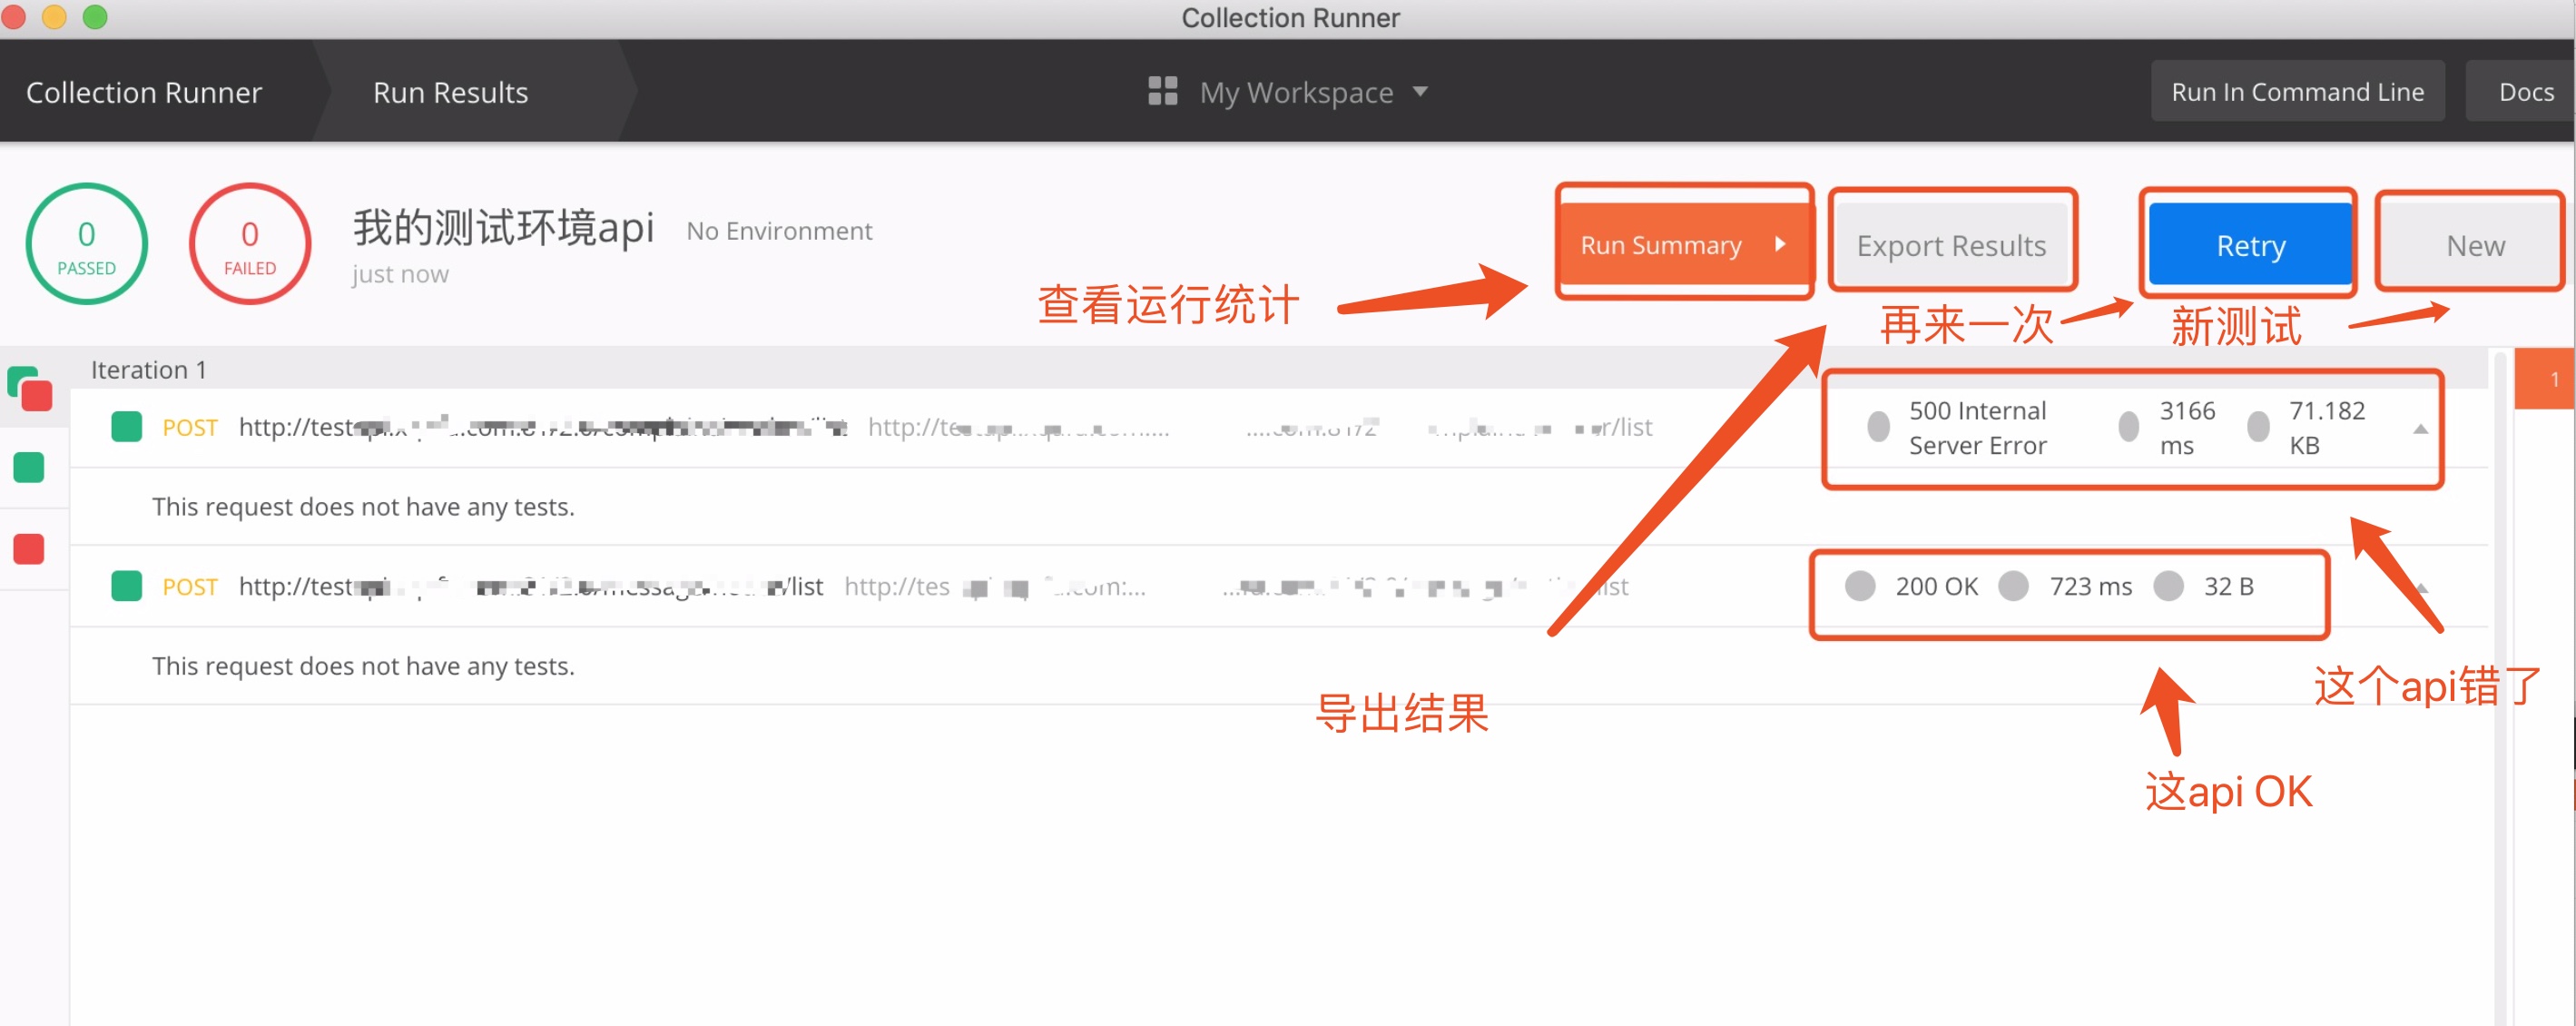
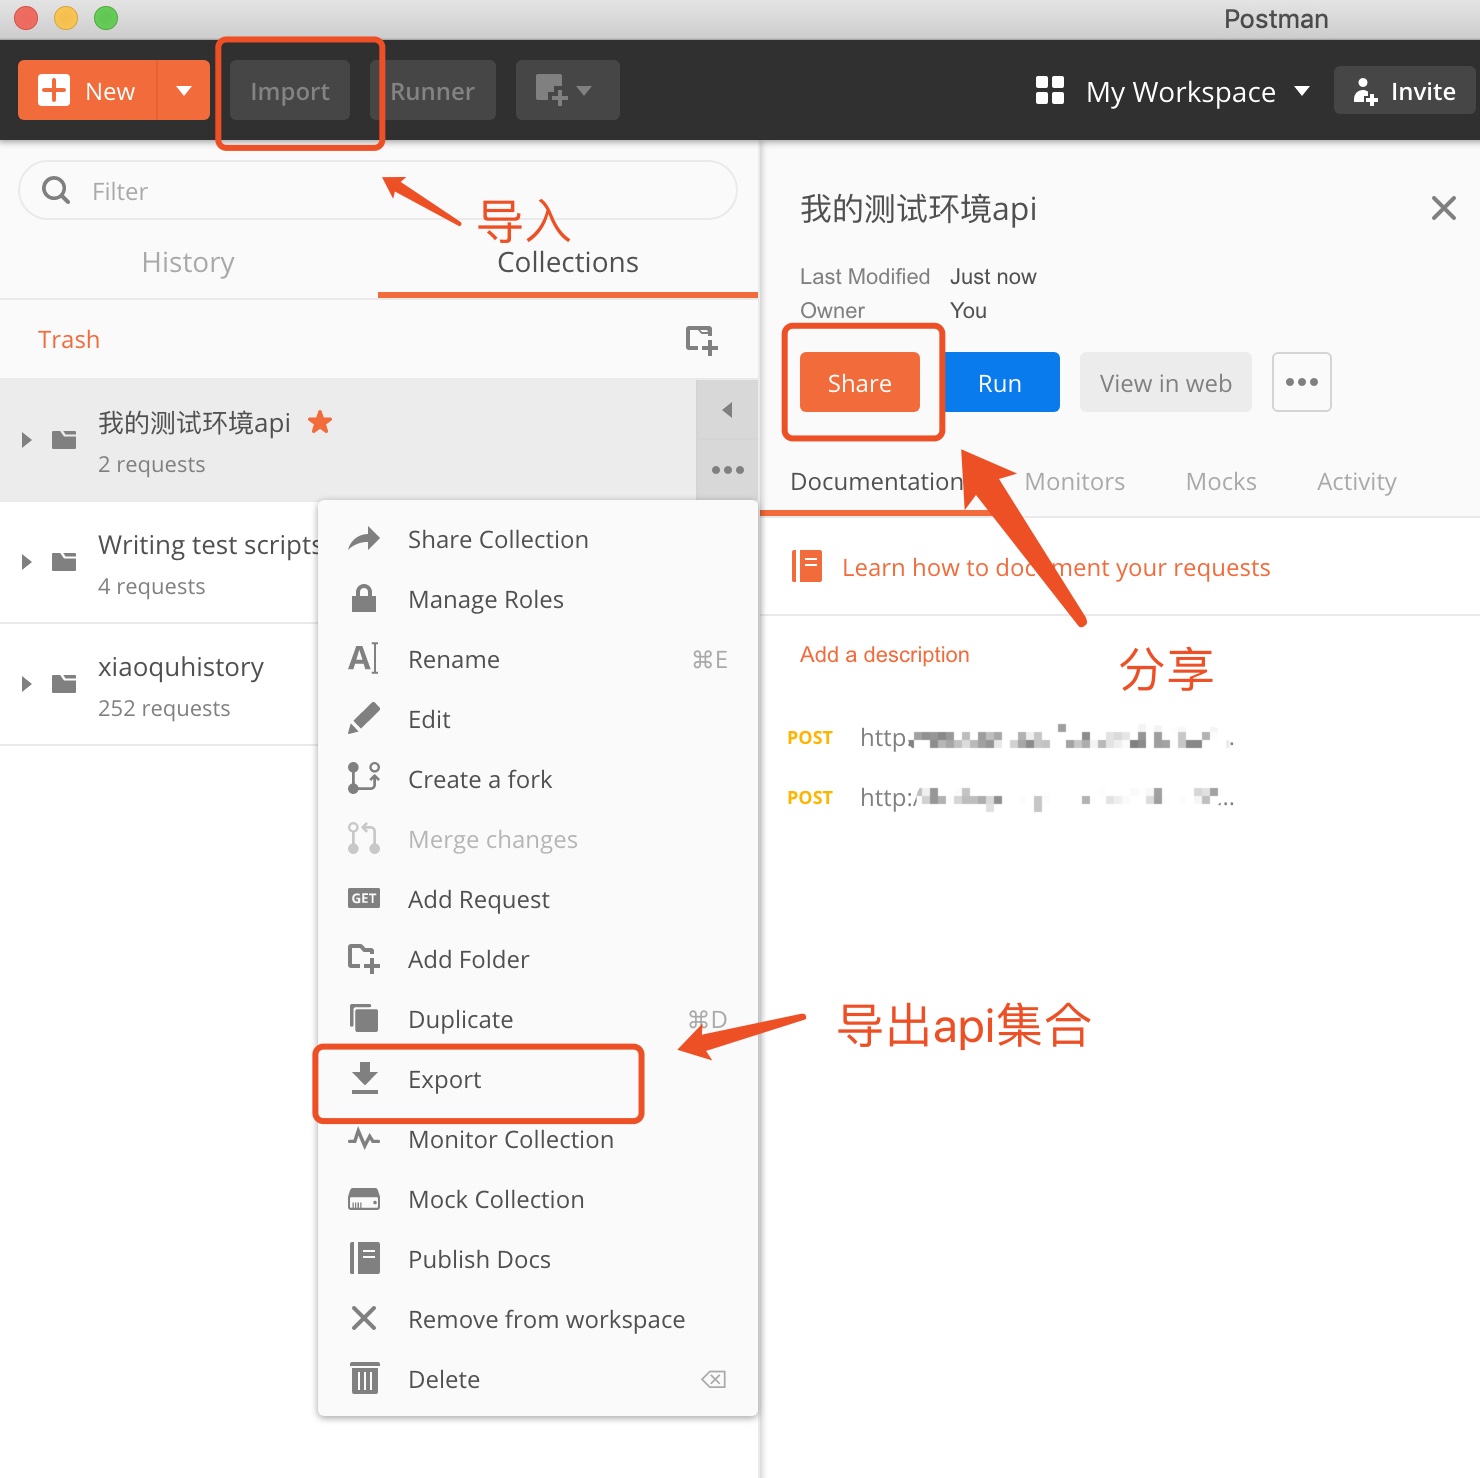
6.测试api集合⇡
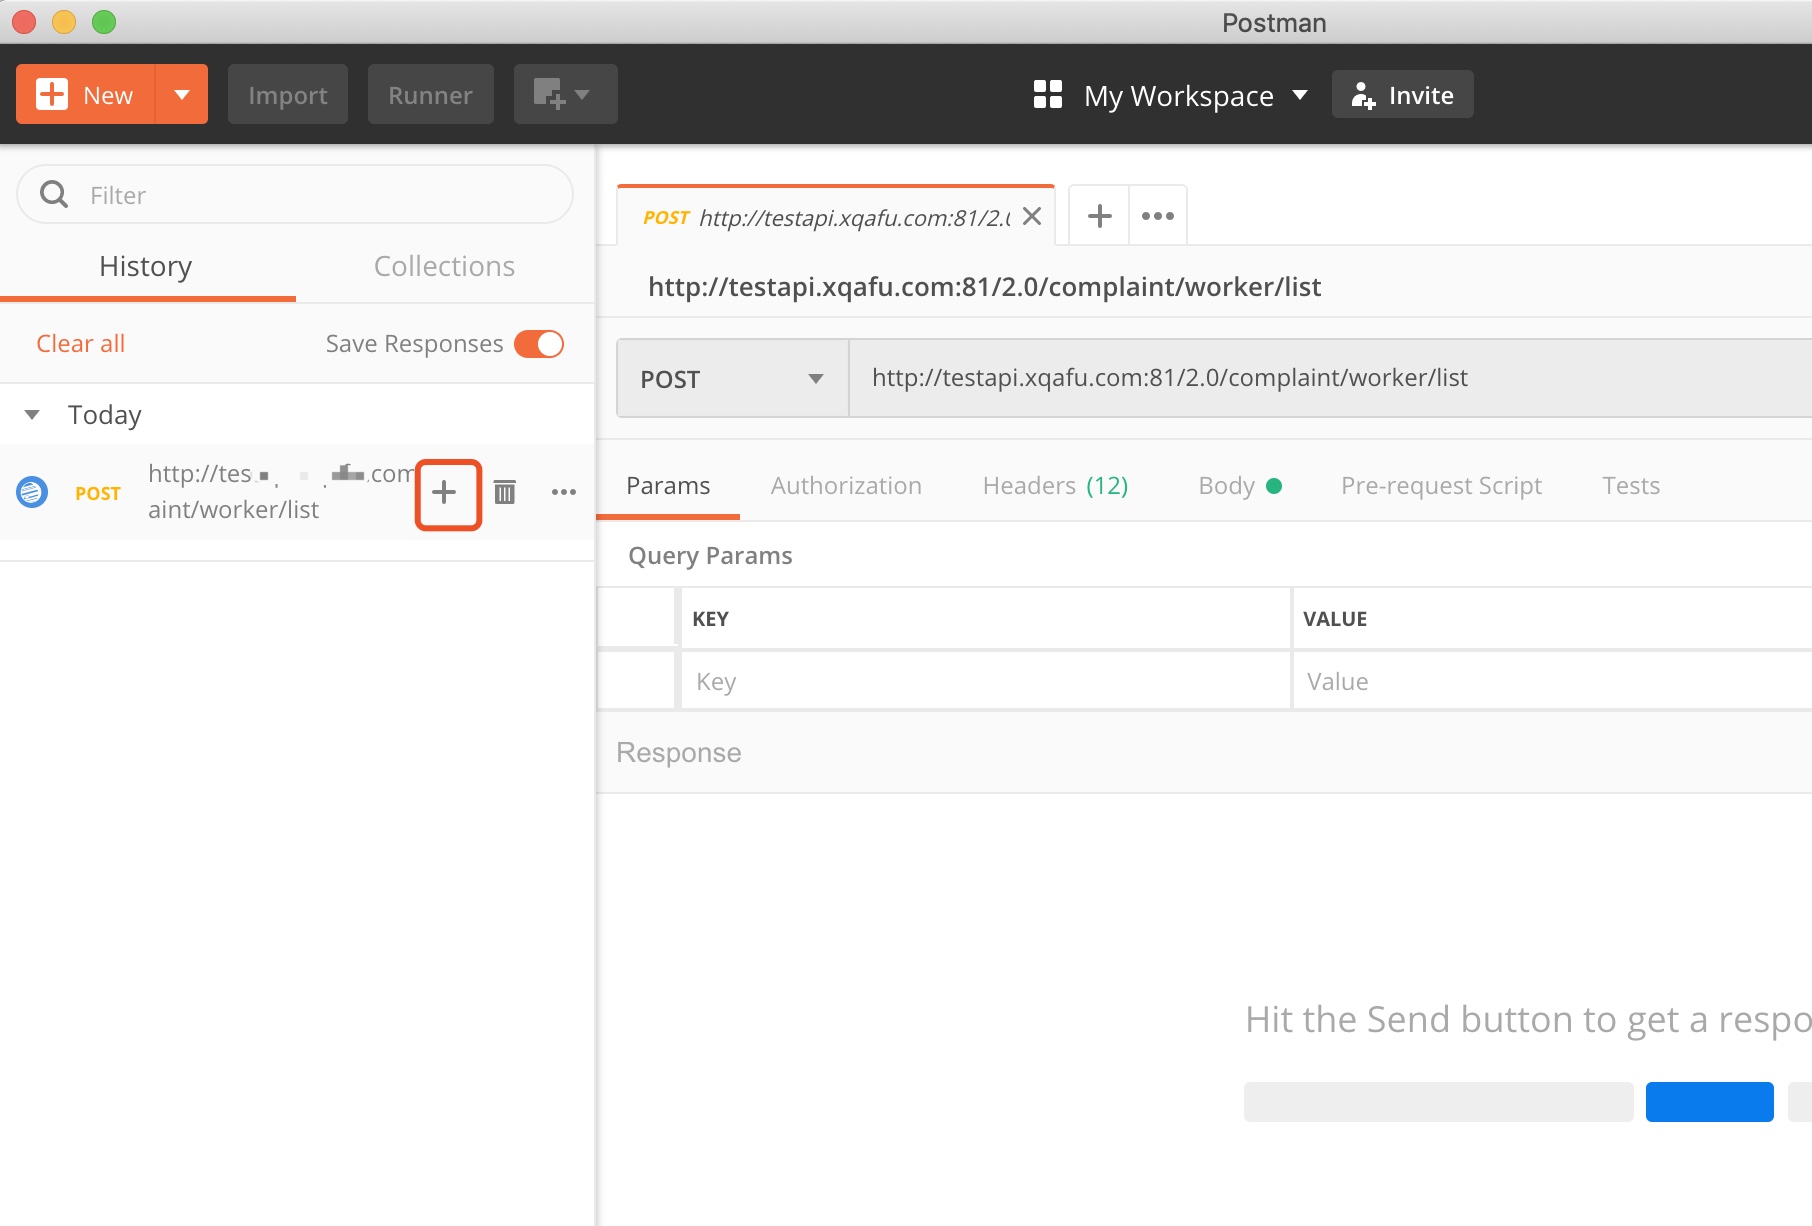
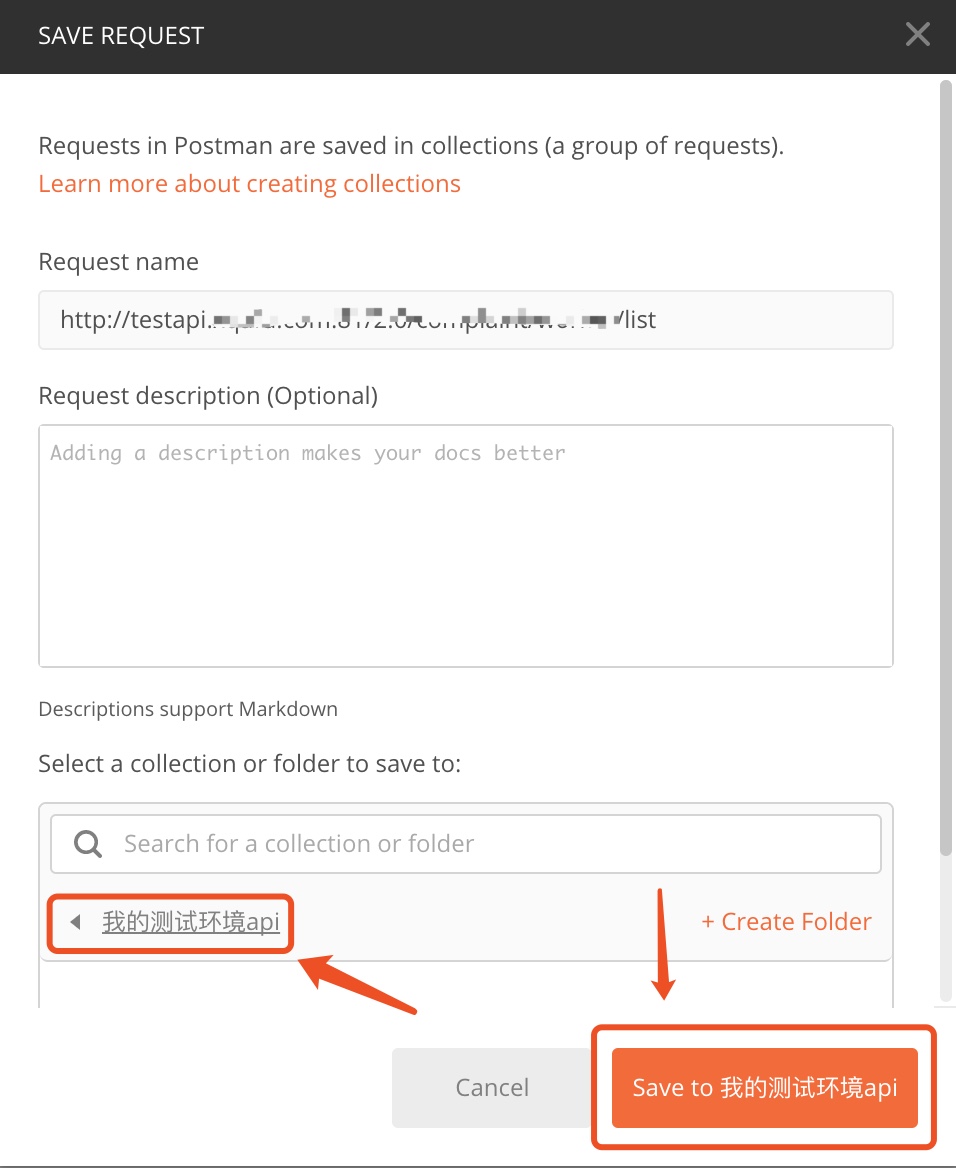
点击主菜单collections数据组 创建一个collections 数据组

在History 点击添加到数据组里
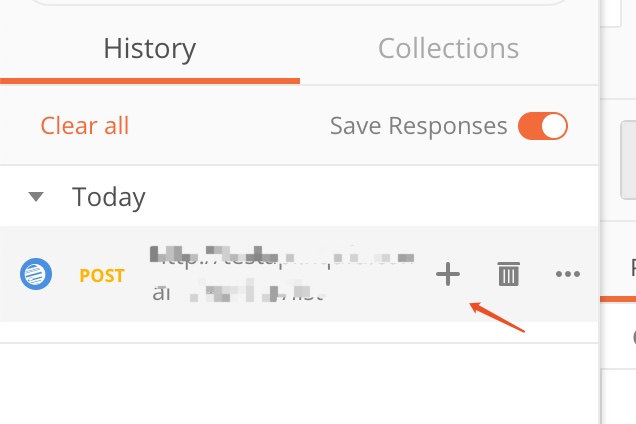
添加刚才创建的数据组
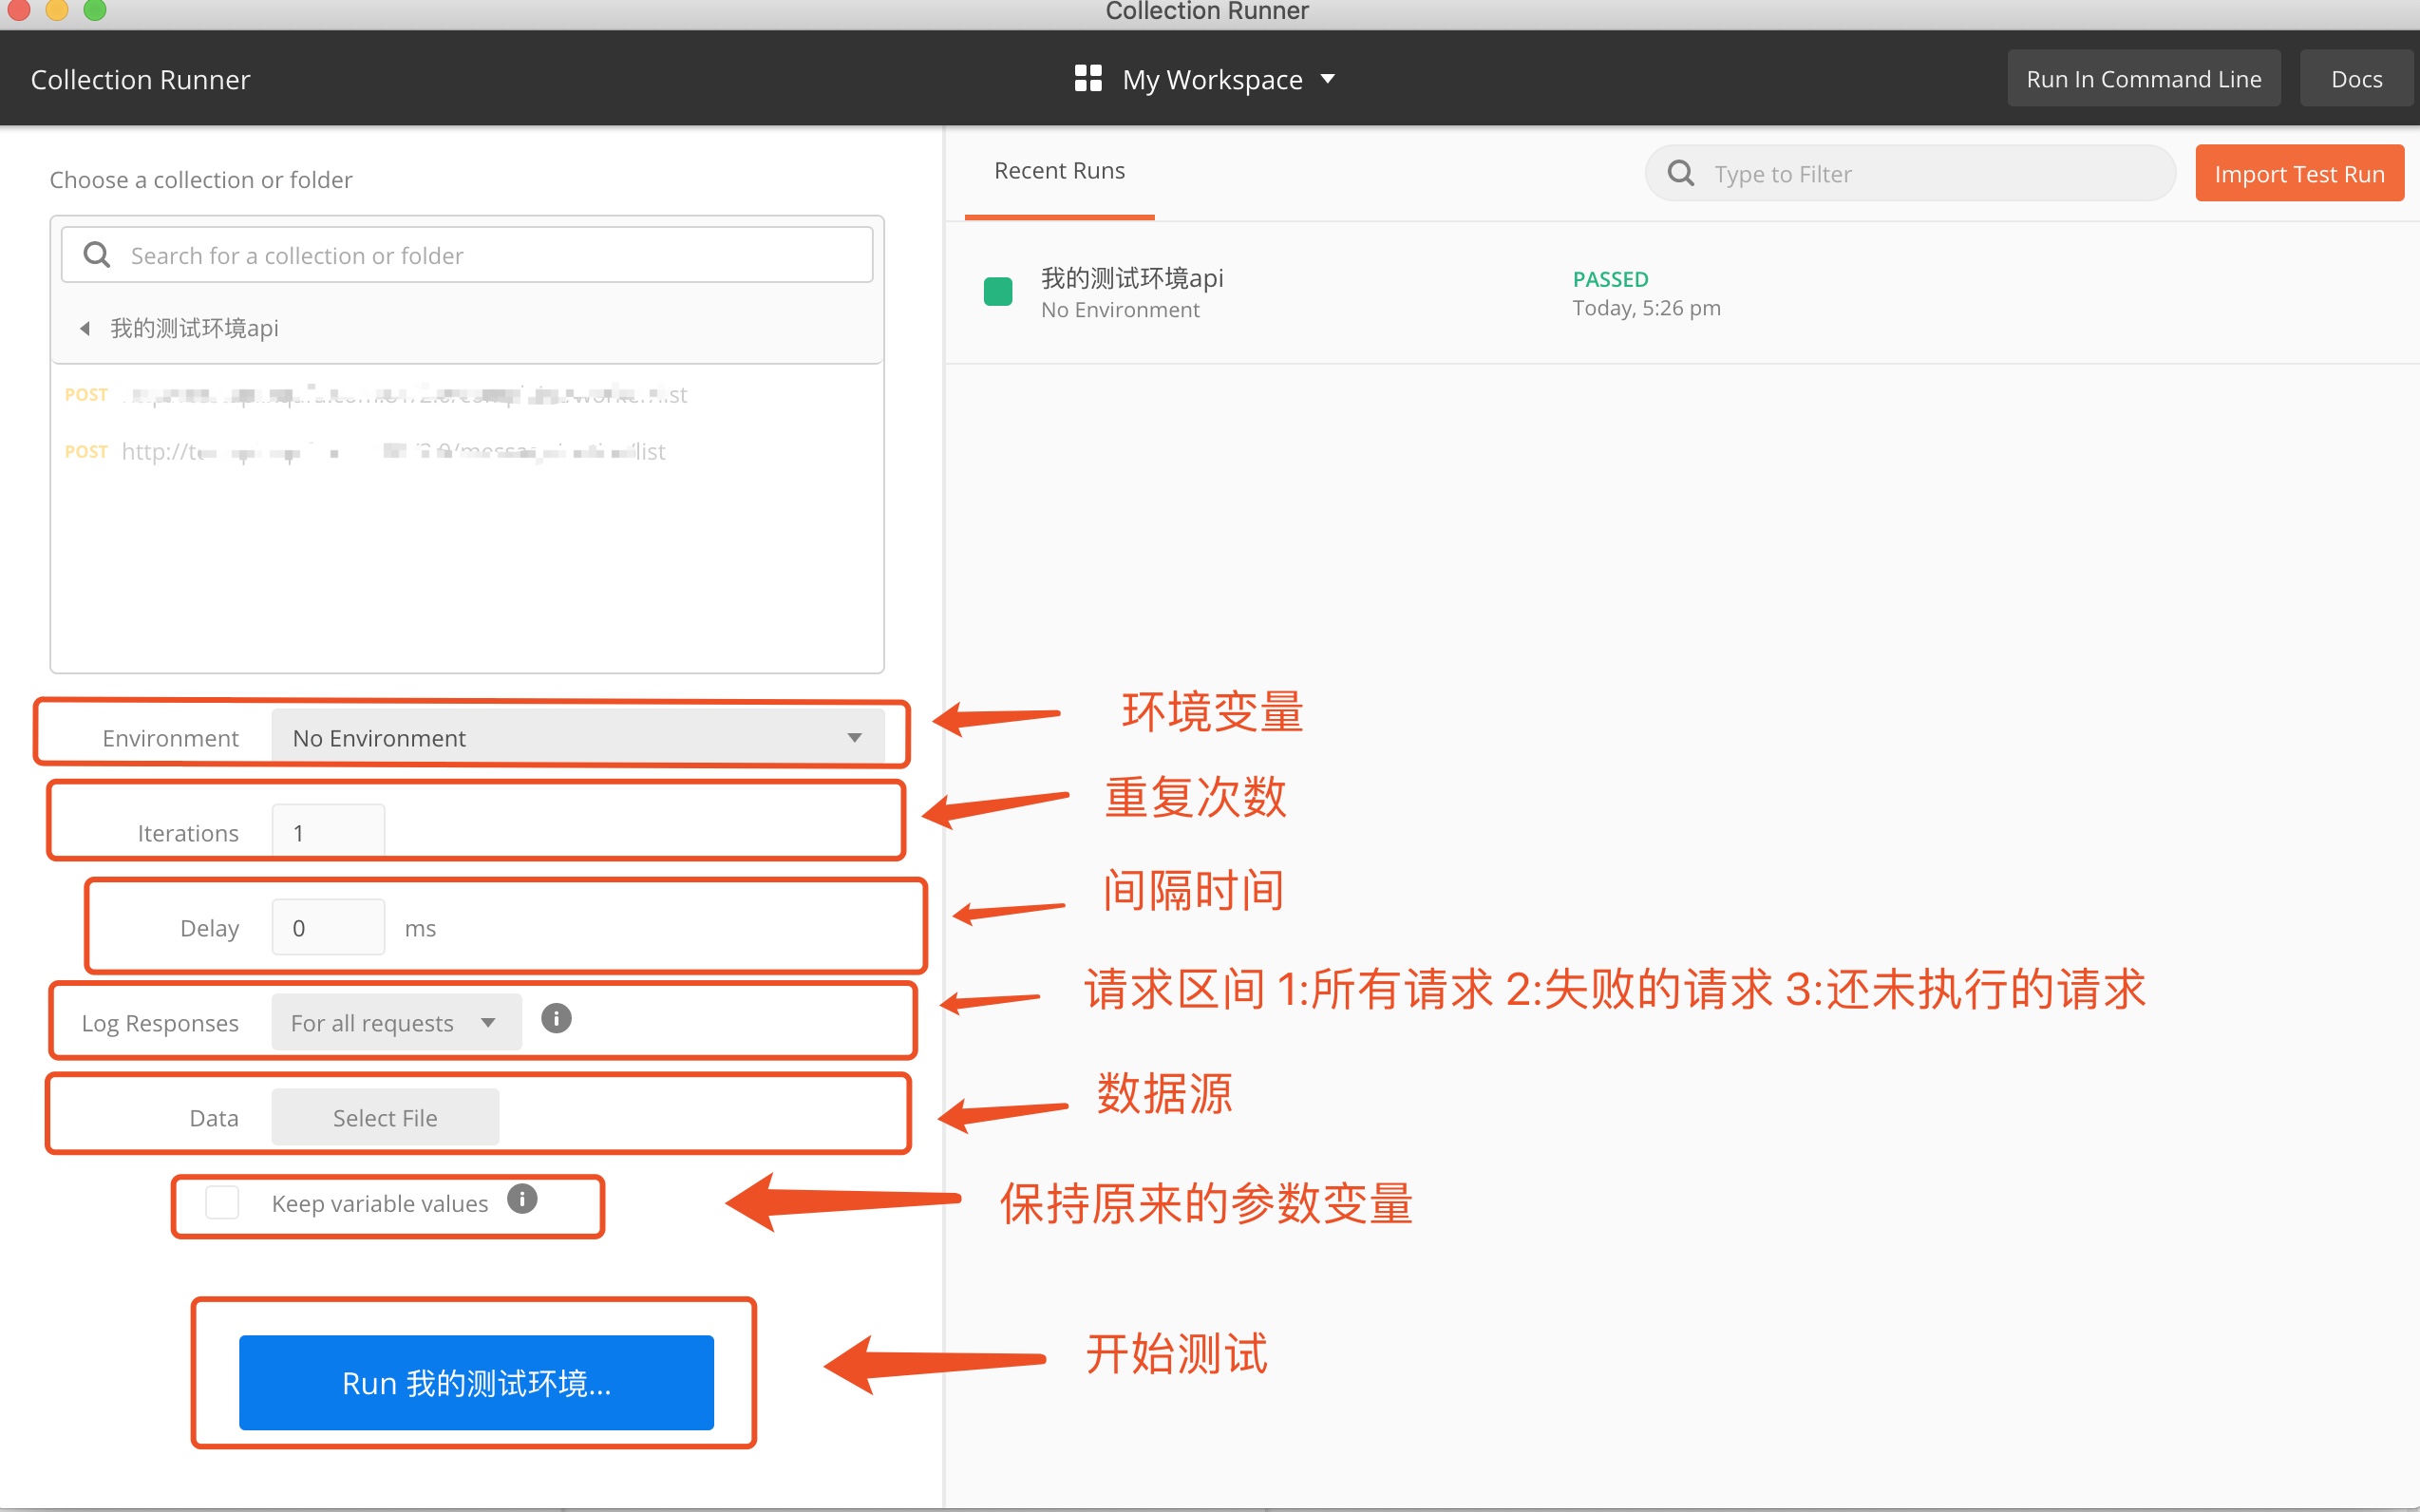
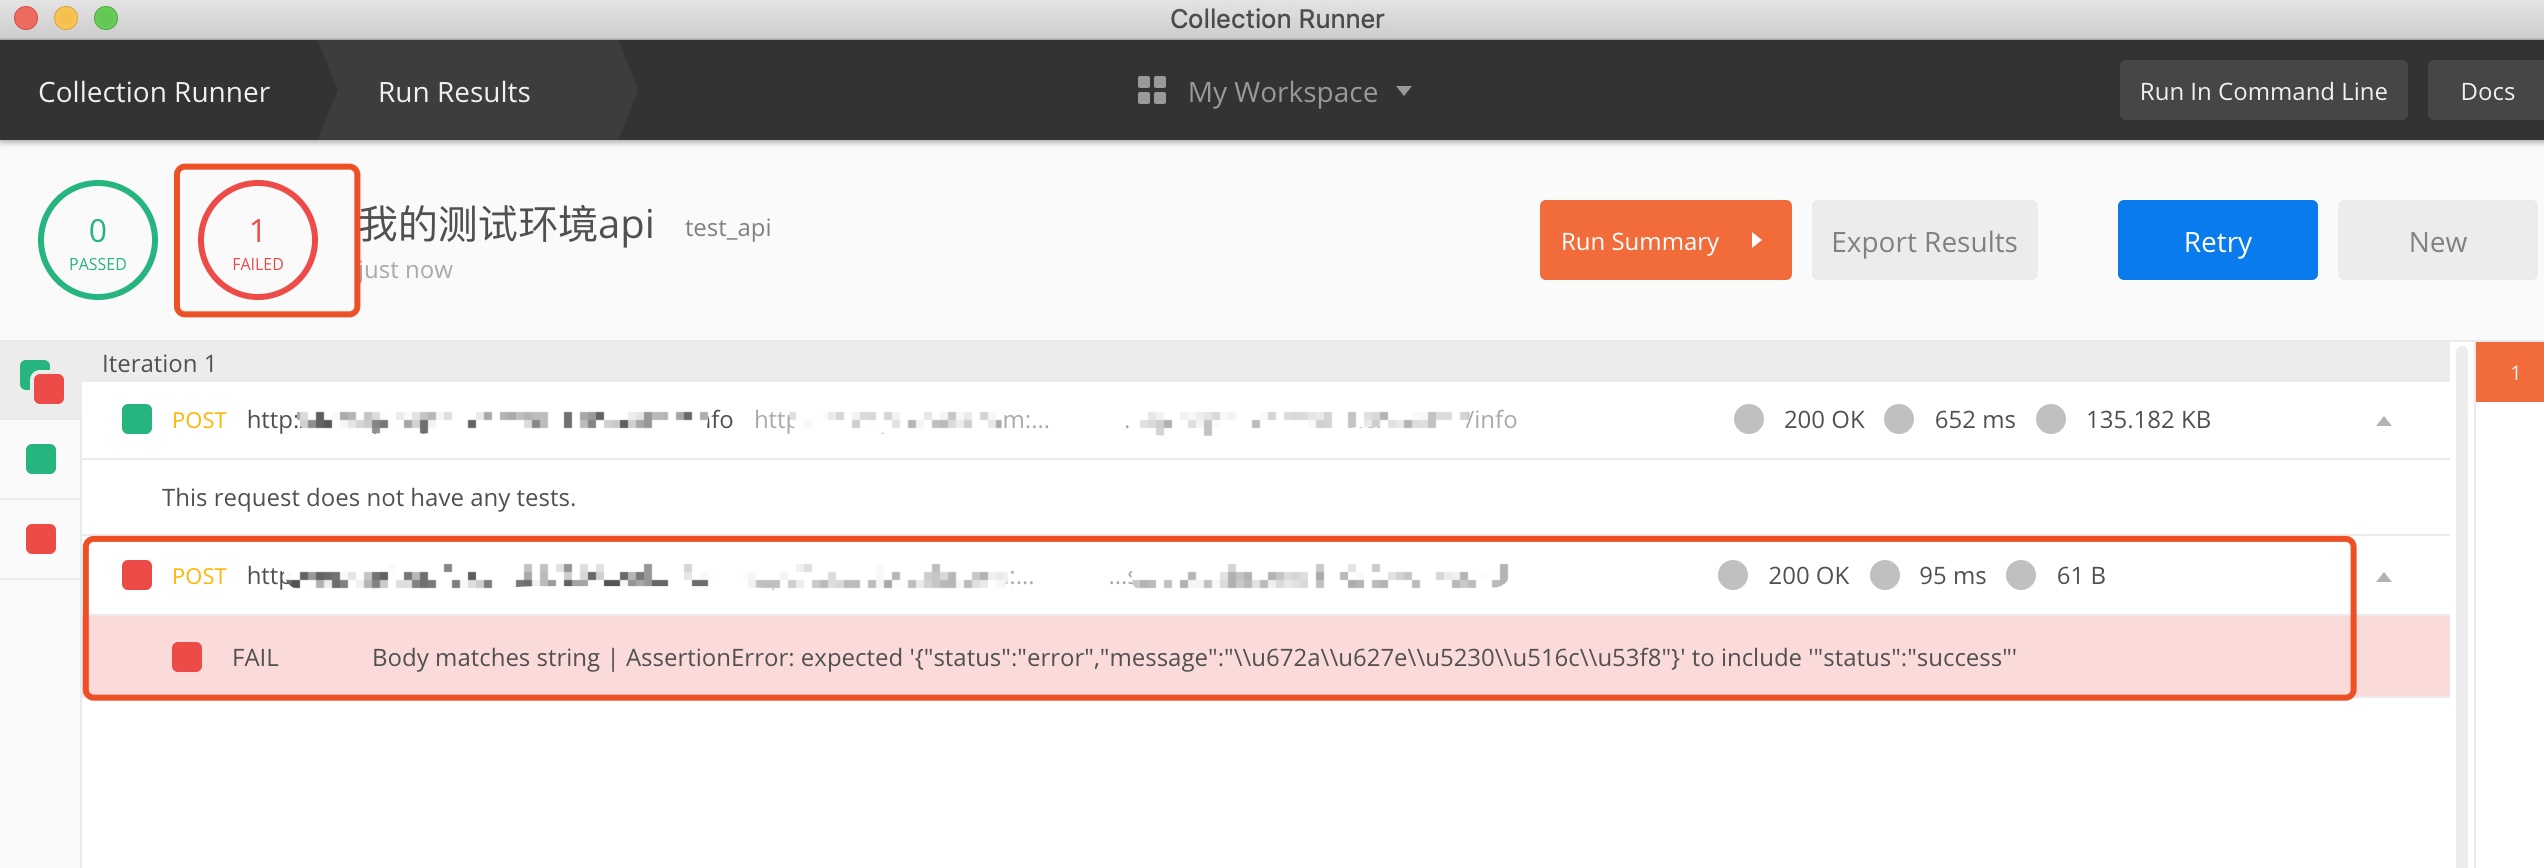
点击数据组里的play工作

点击数据里的run运行

进入到统计界面 这里可以设置 环境变量再点击run 这里的数据源是用来批量导入参数的
见批量导入支持txt json csv 其中csv window可以用office mac可以用Number表格来编辑
可以格式如图
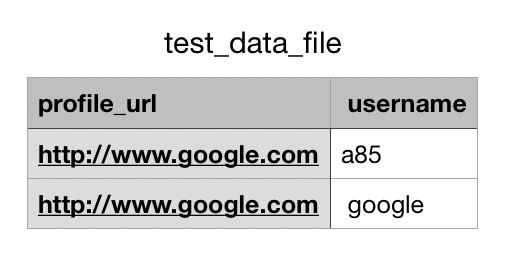
示例下载:CSV示例 下载 https://s3.amazonaws.com/postman-static-getpostman-com/postman-docs/test_data_file.csv
执行后显示结果
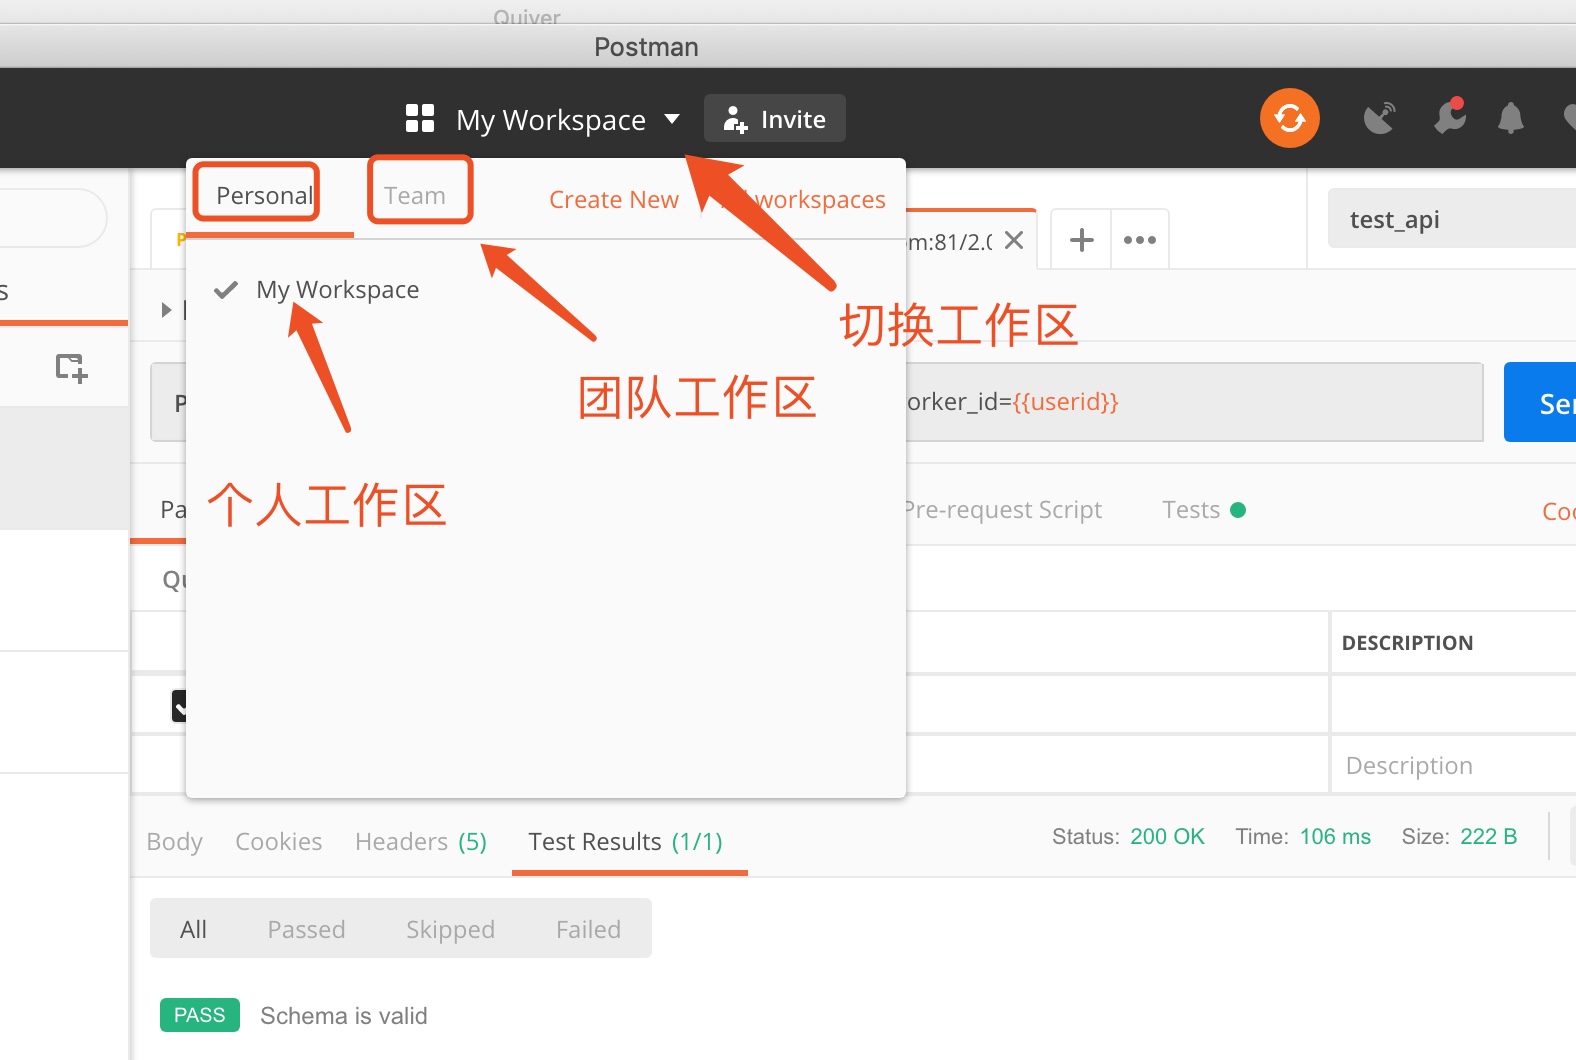
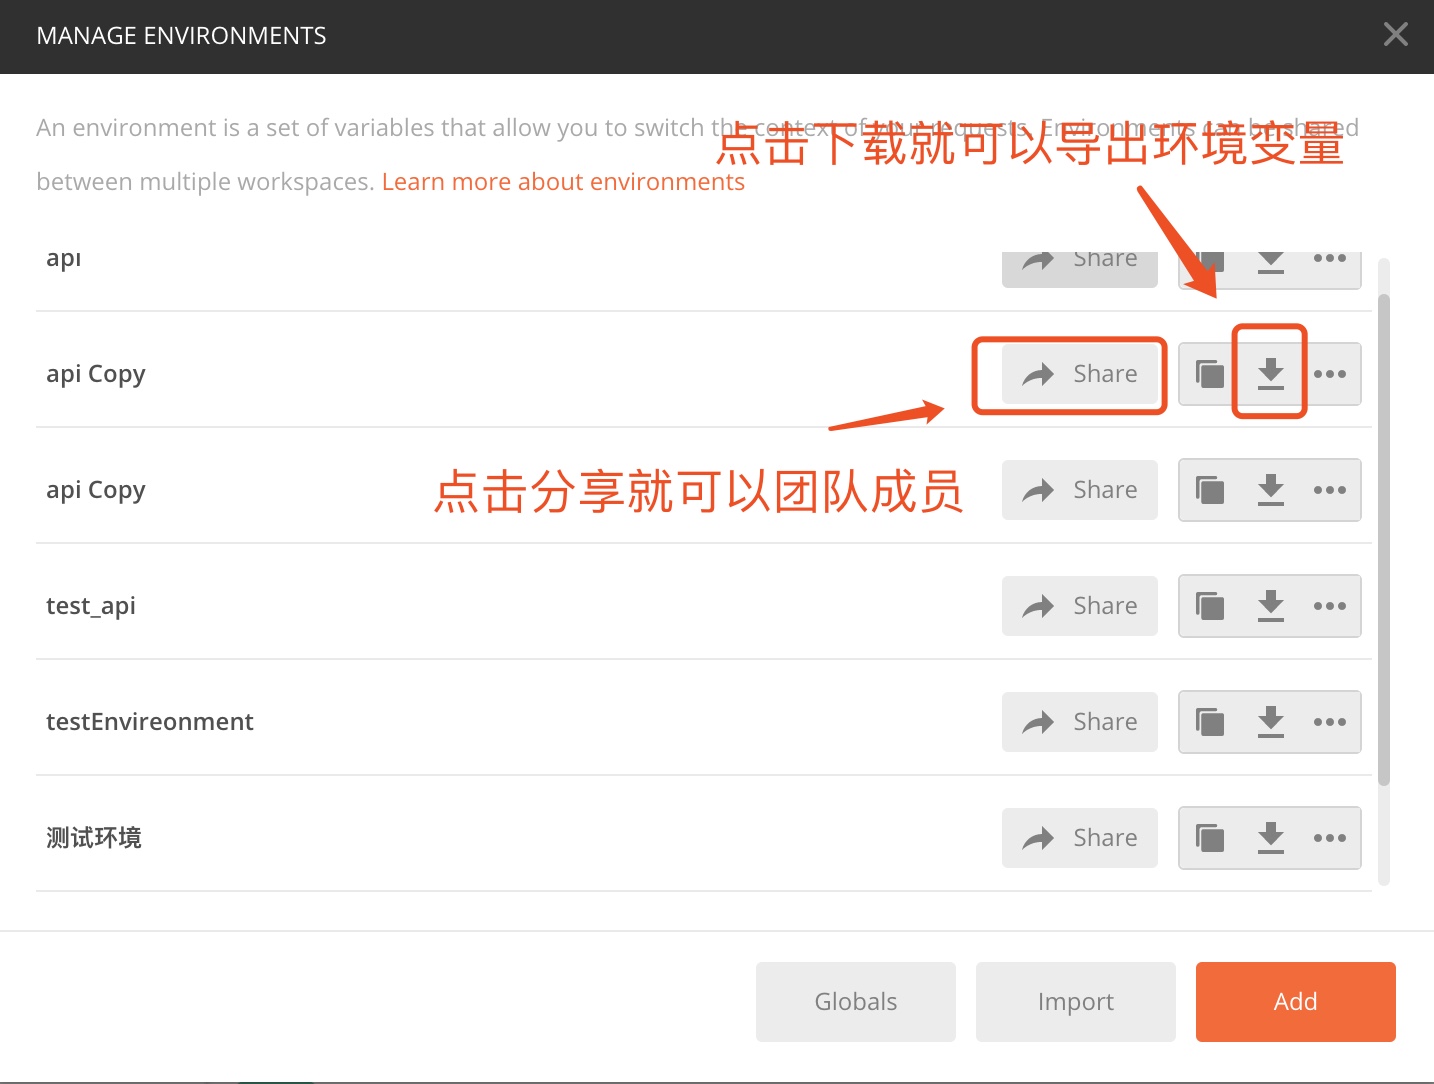
7.Postman 环境变量与cookie⇡
点右上角第二个menu选项
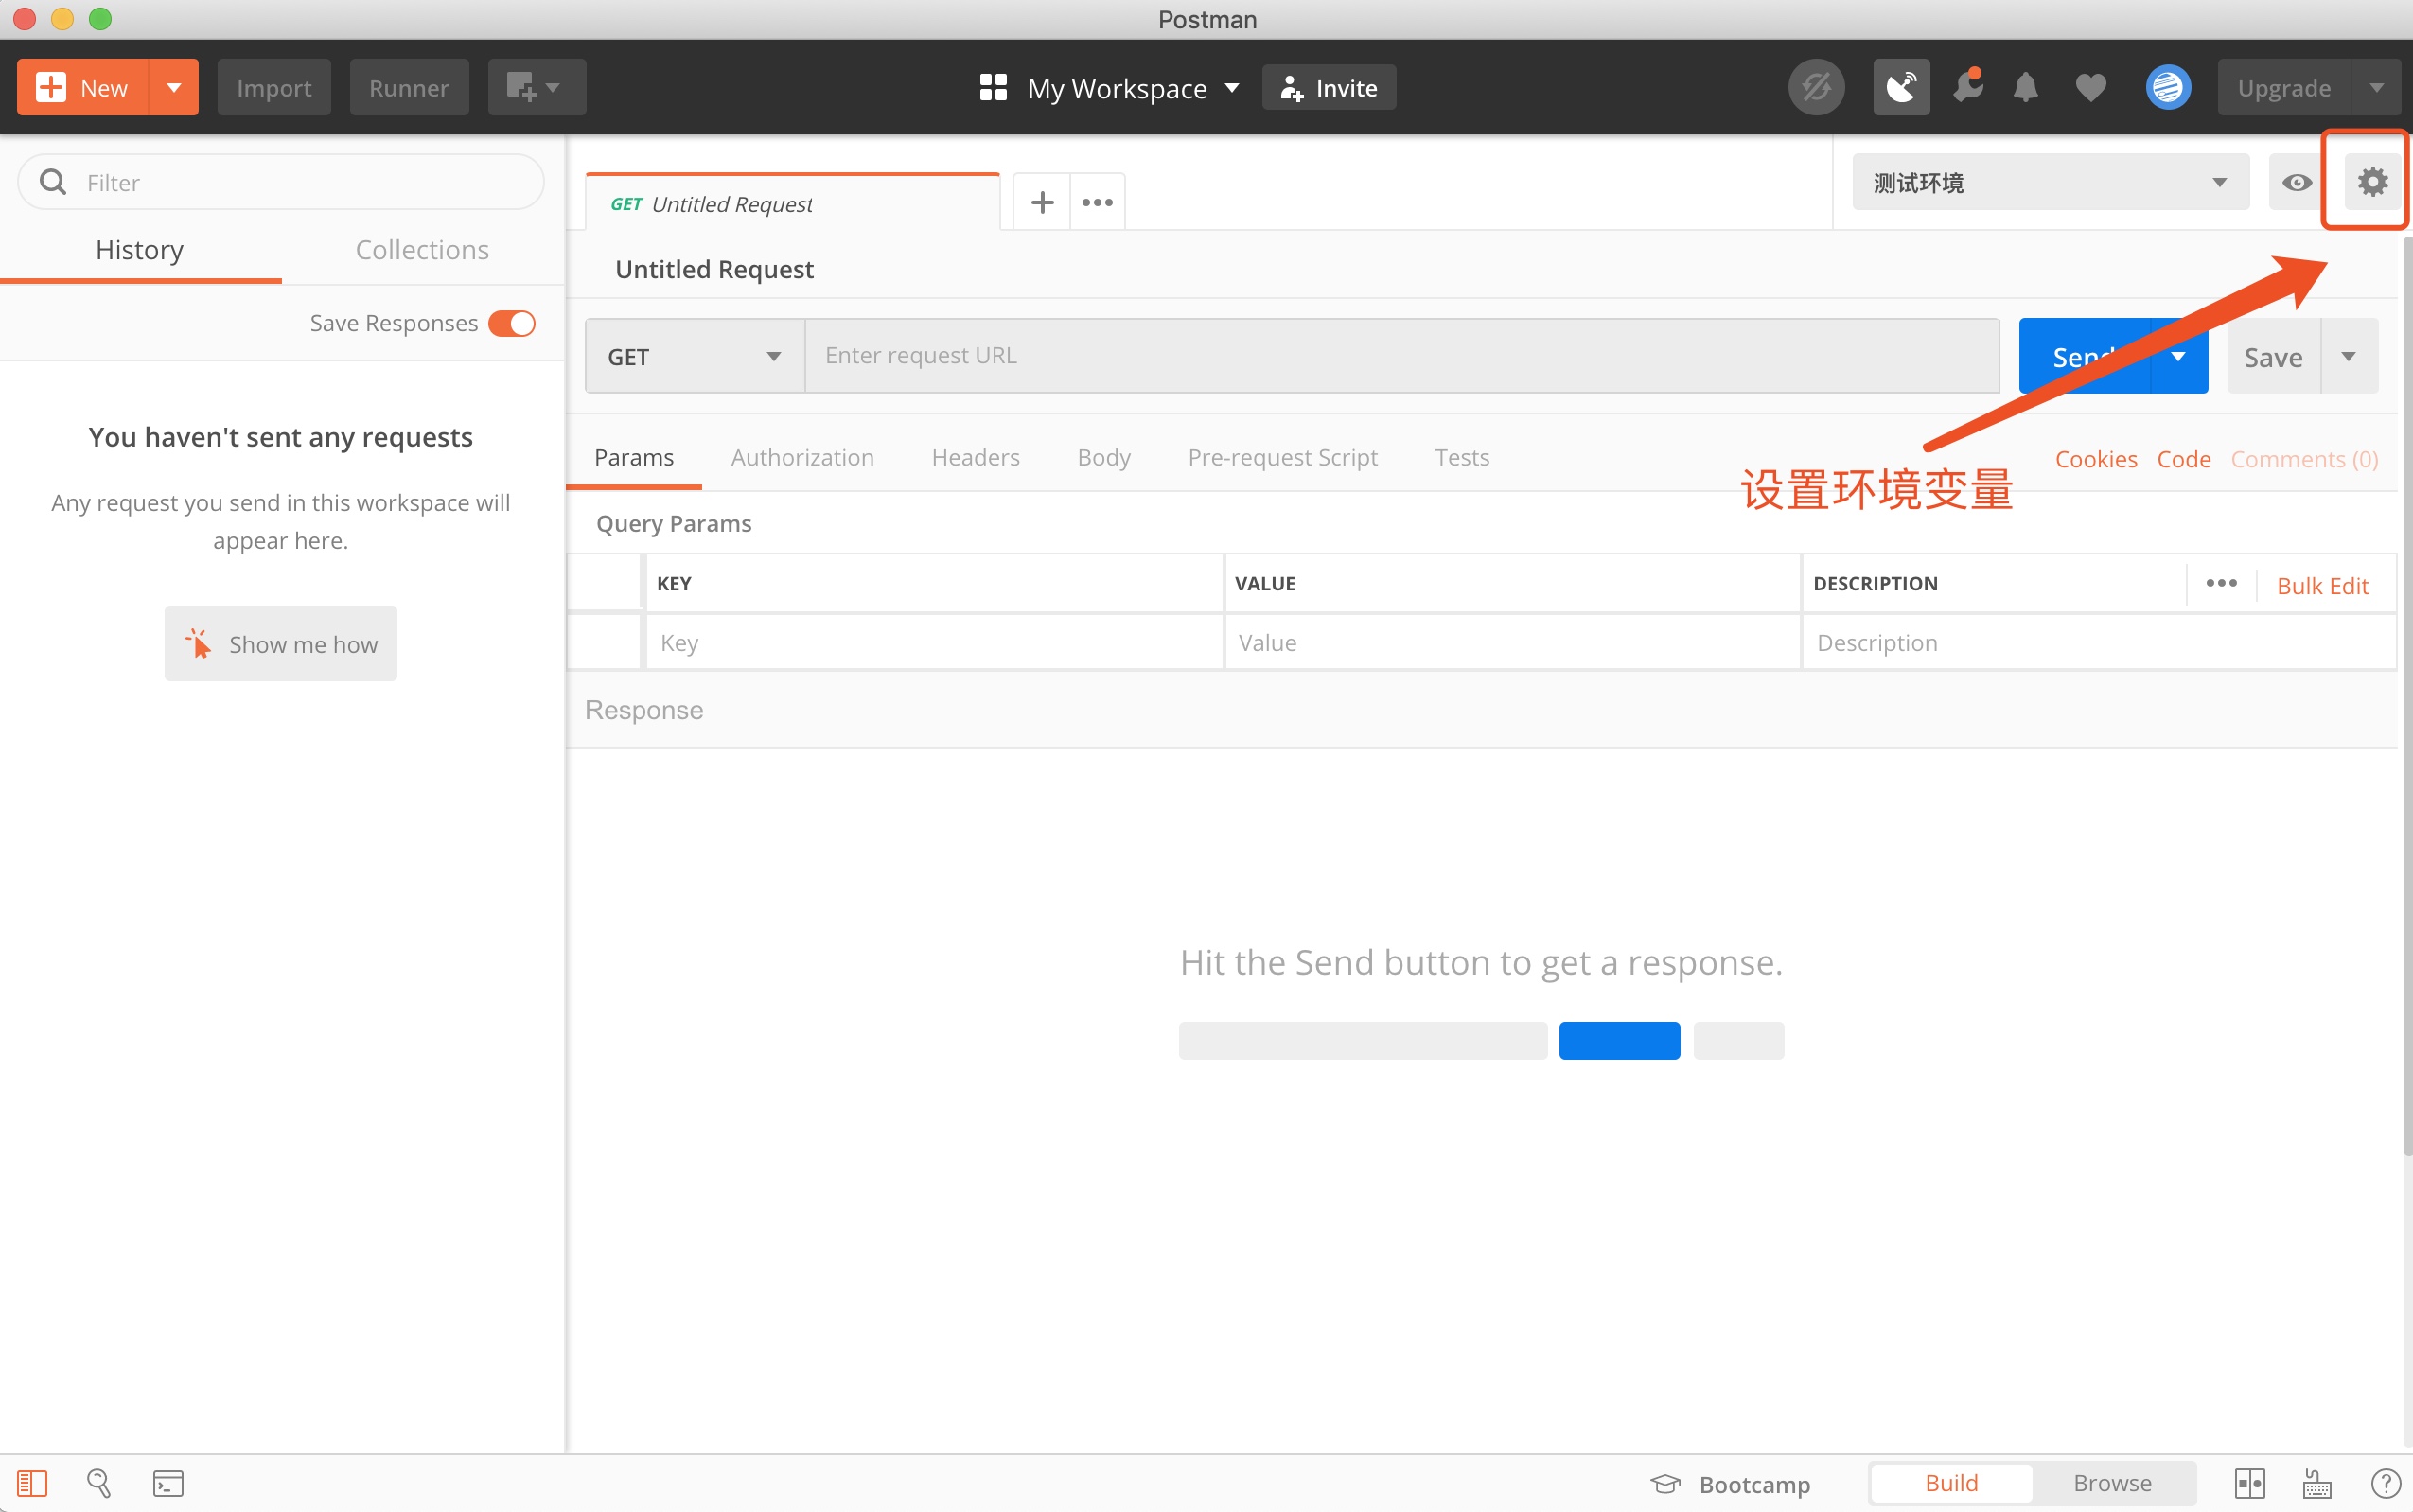
点击Add 新建一个环境变量
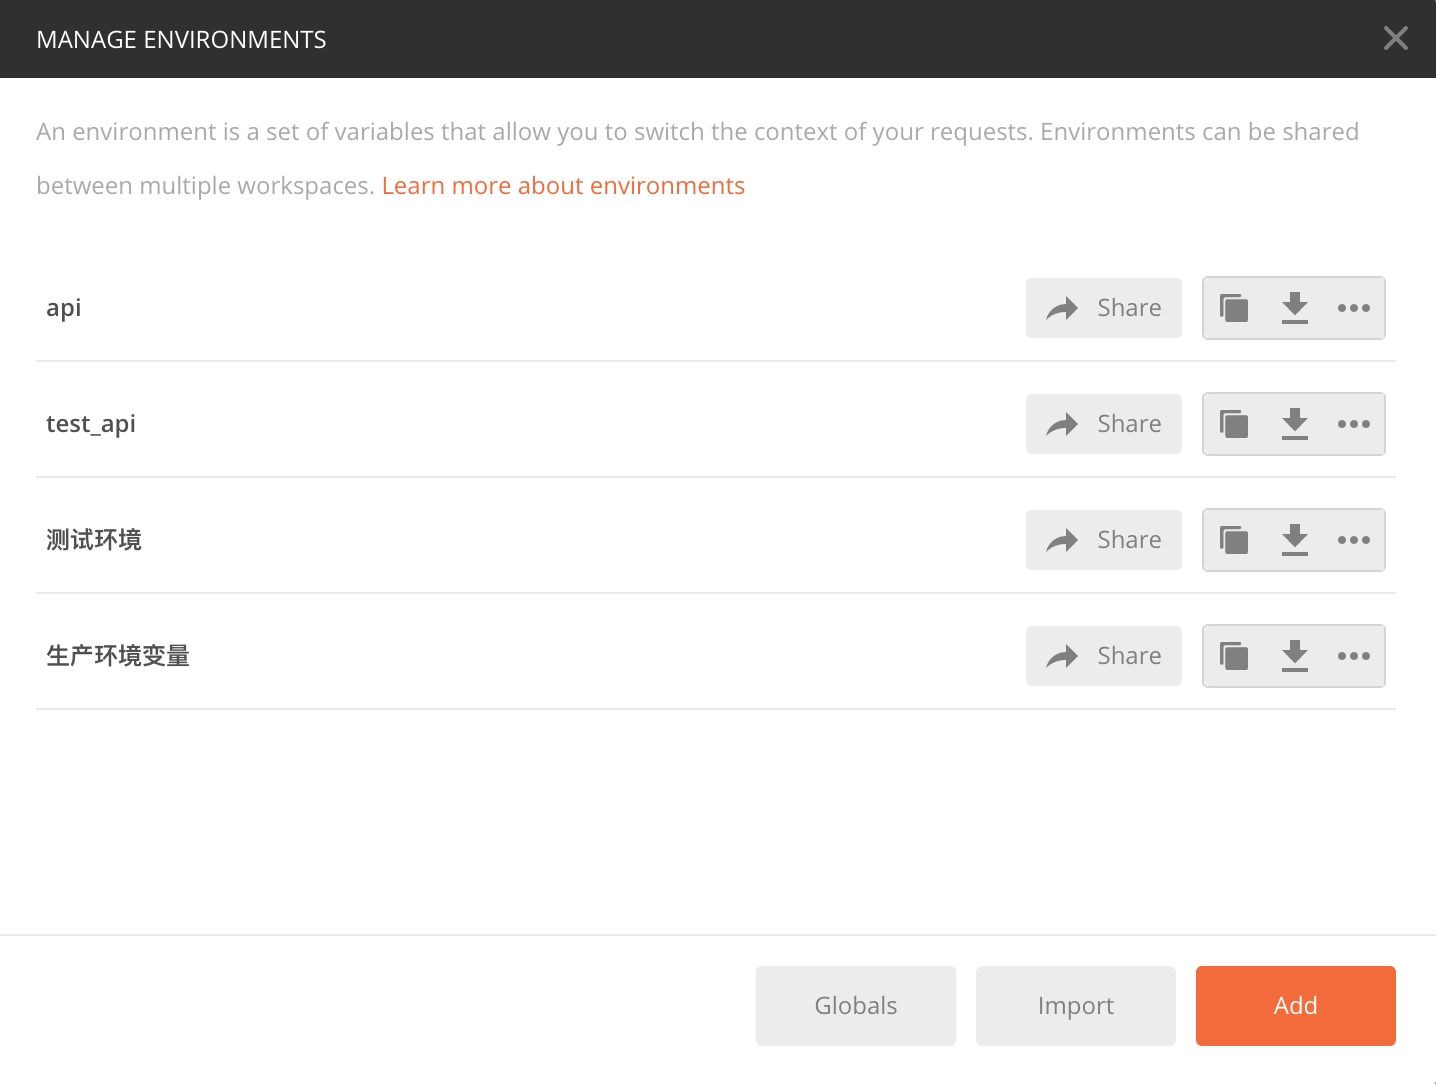
配置你的环境
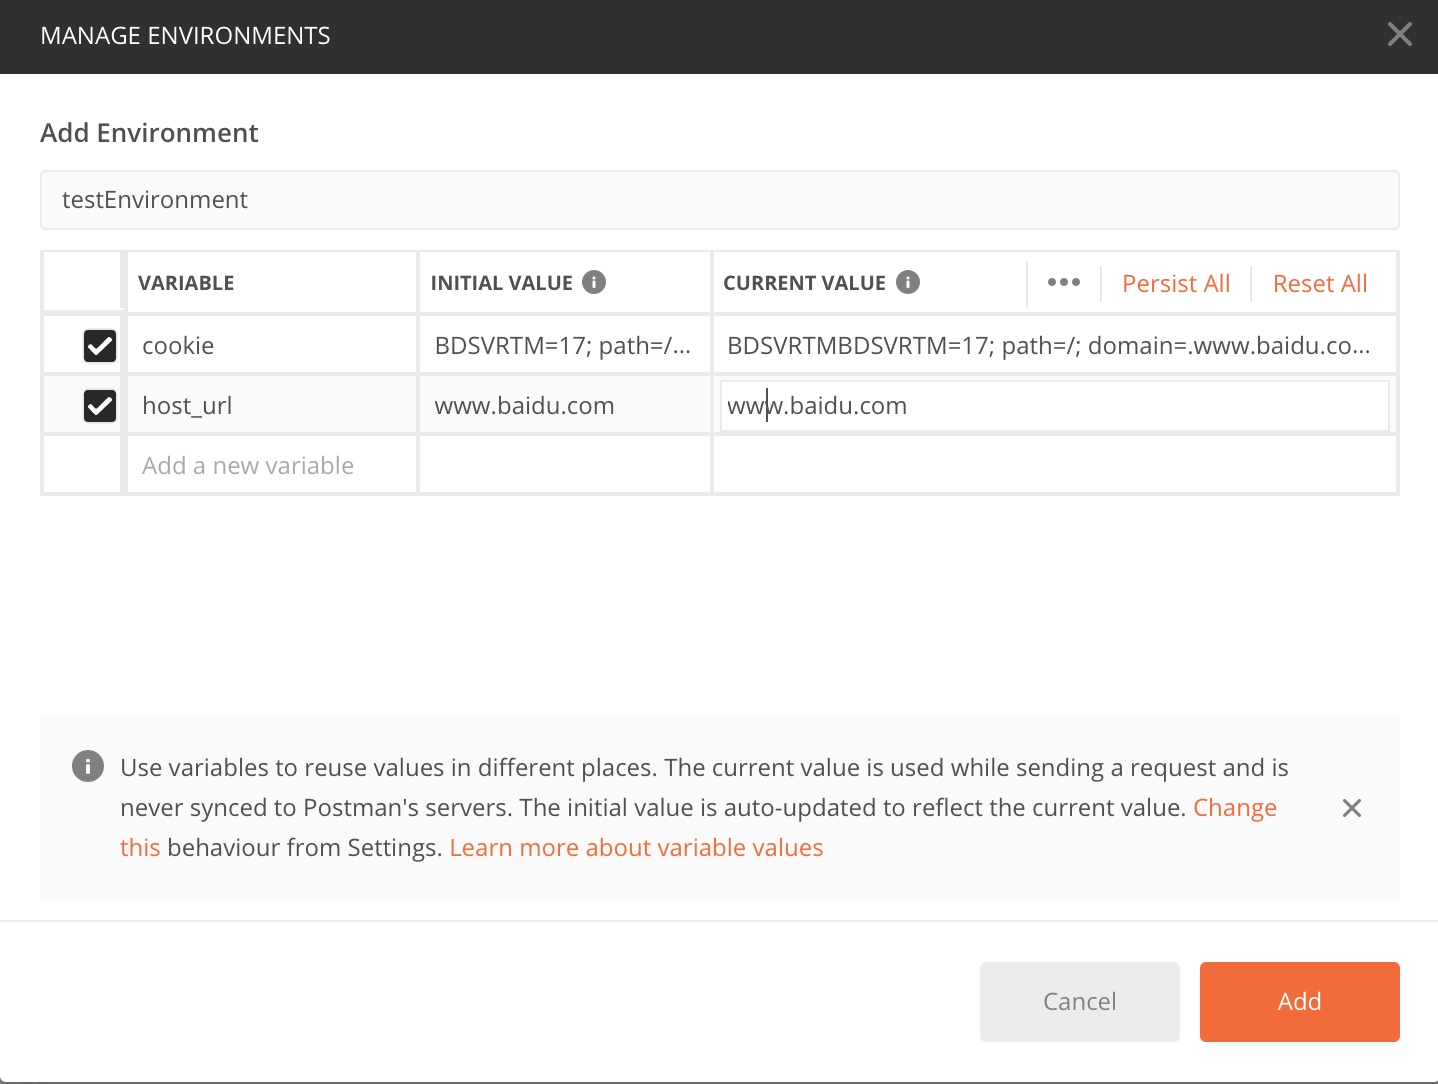
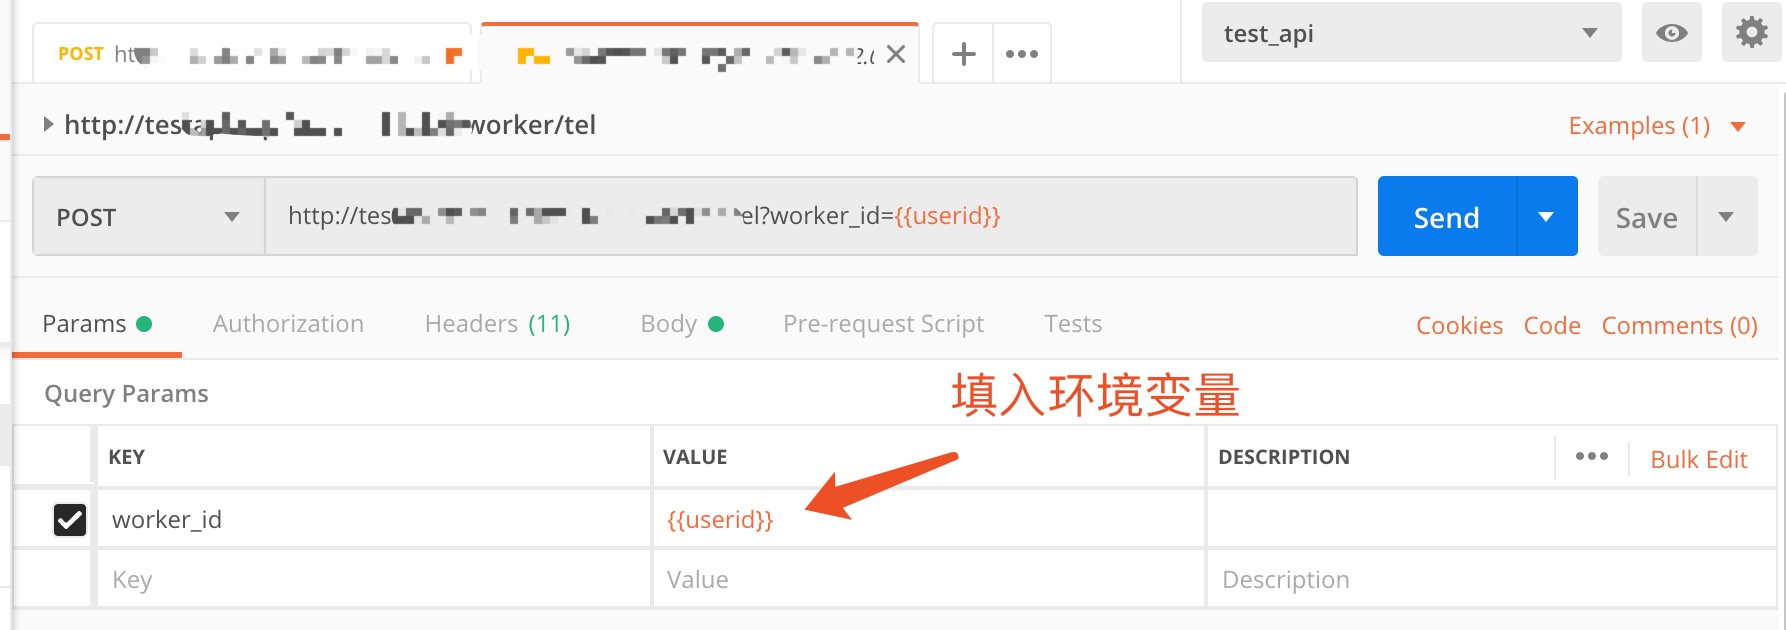
切换到你的环境变量 并使用你的环境变量 格式时{{}}
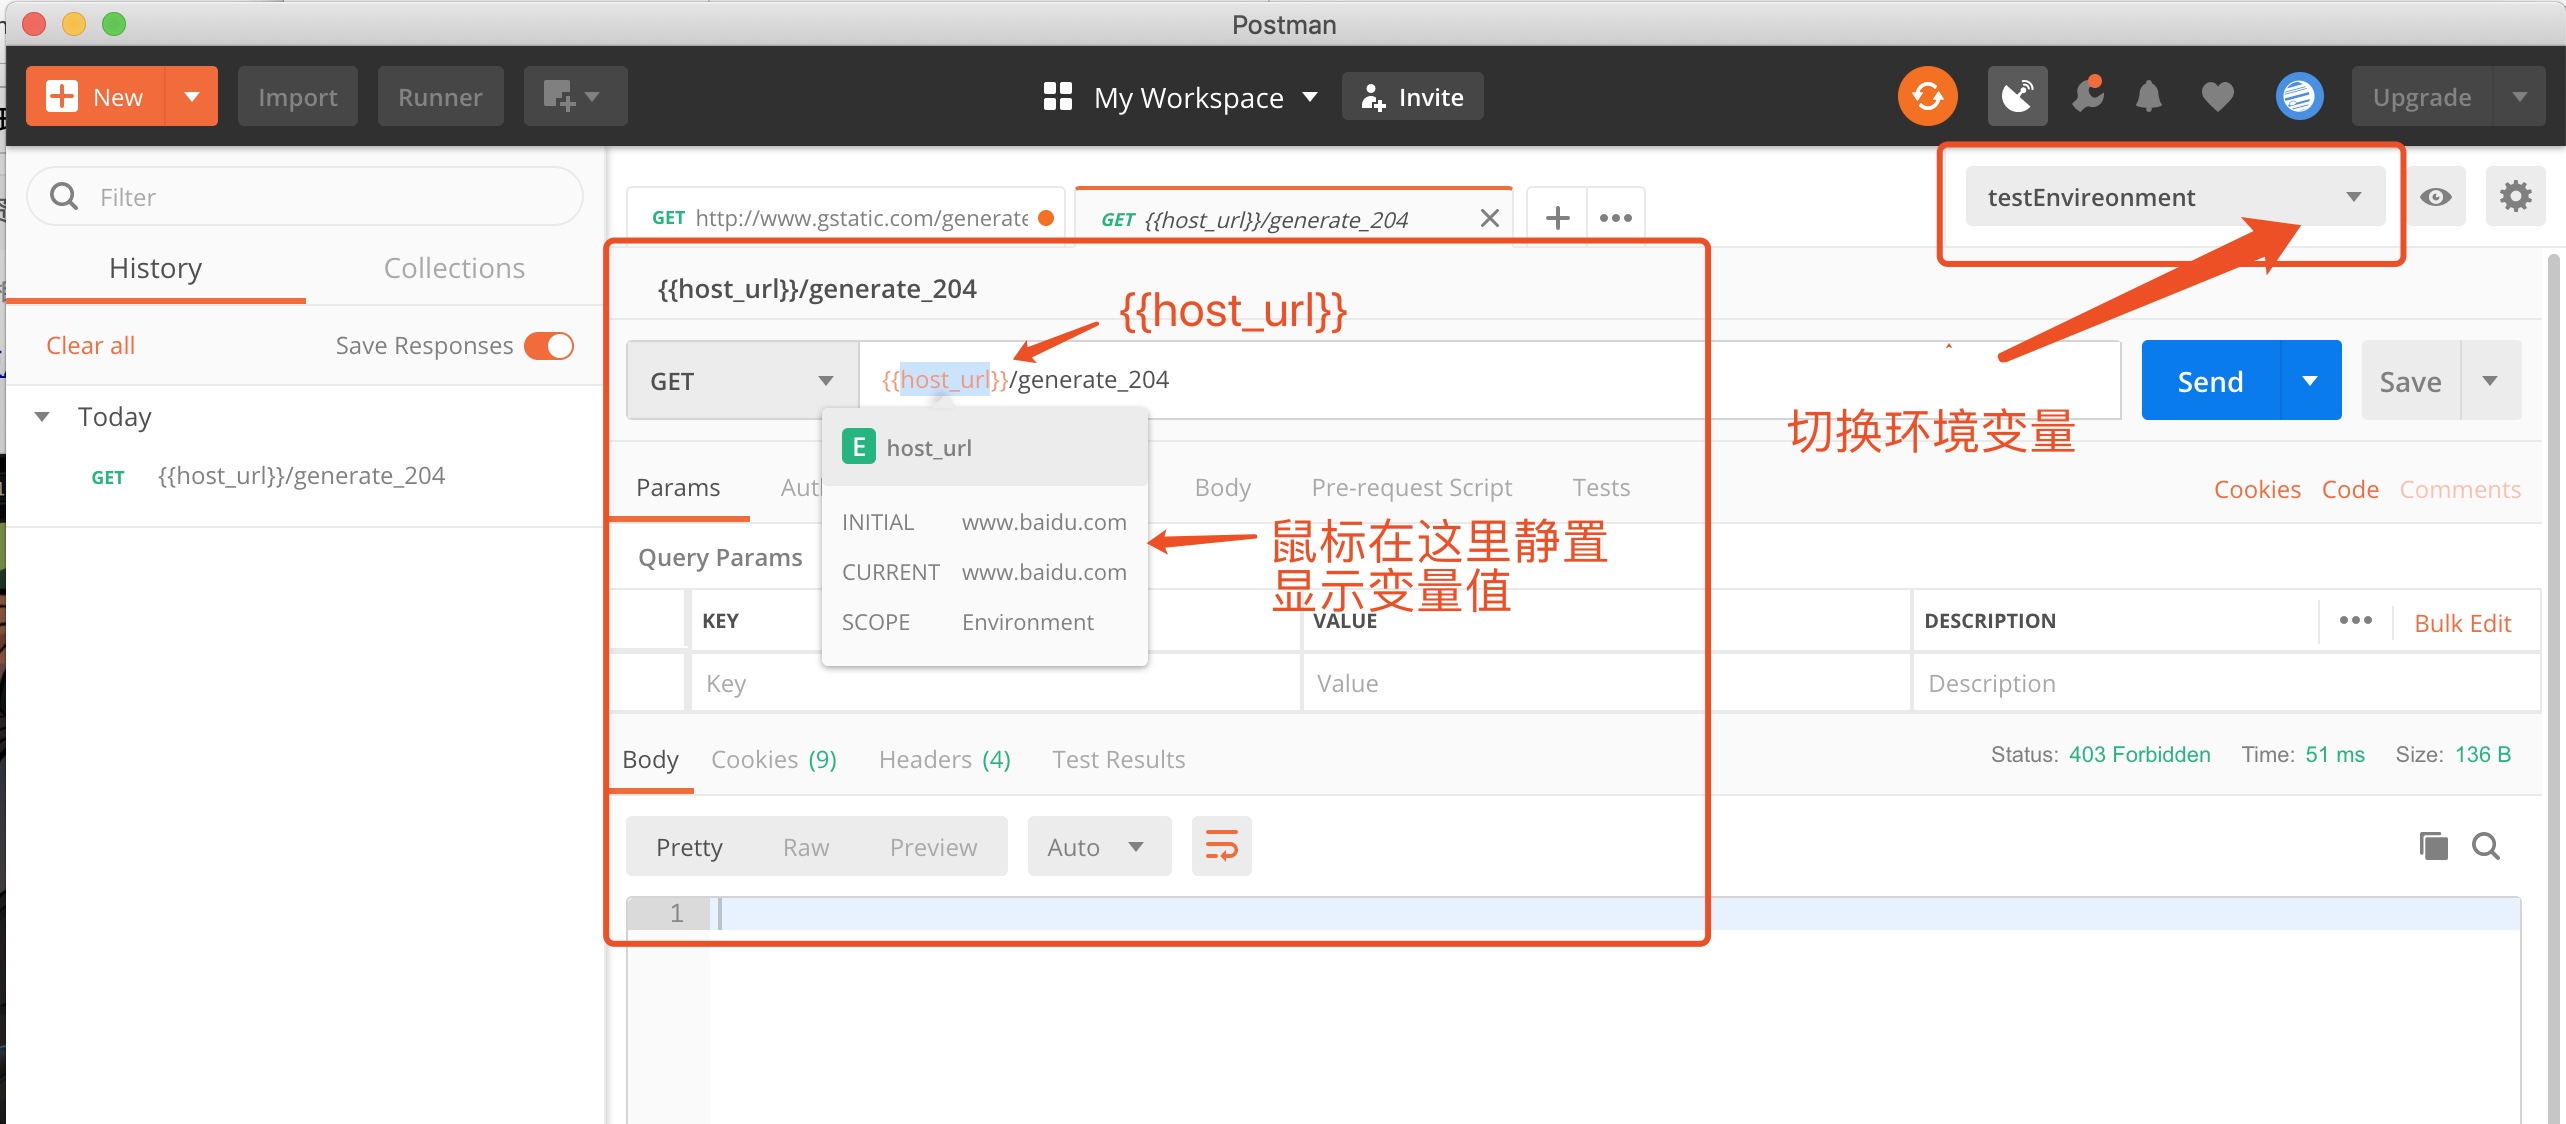
设置cookie ⇡
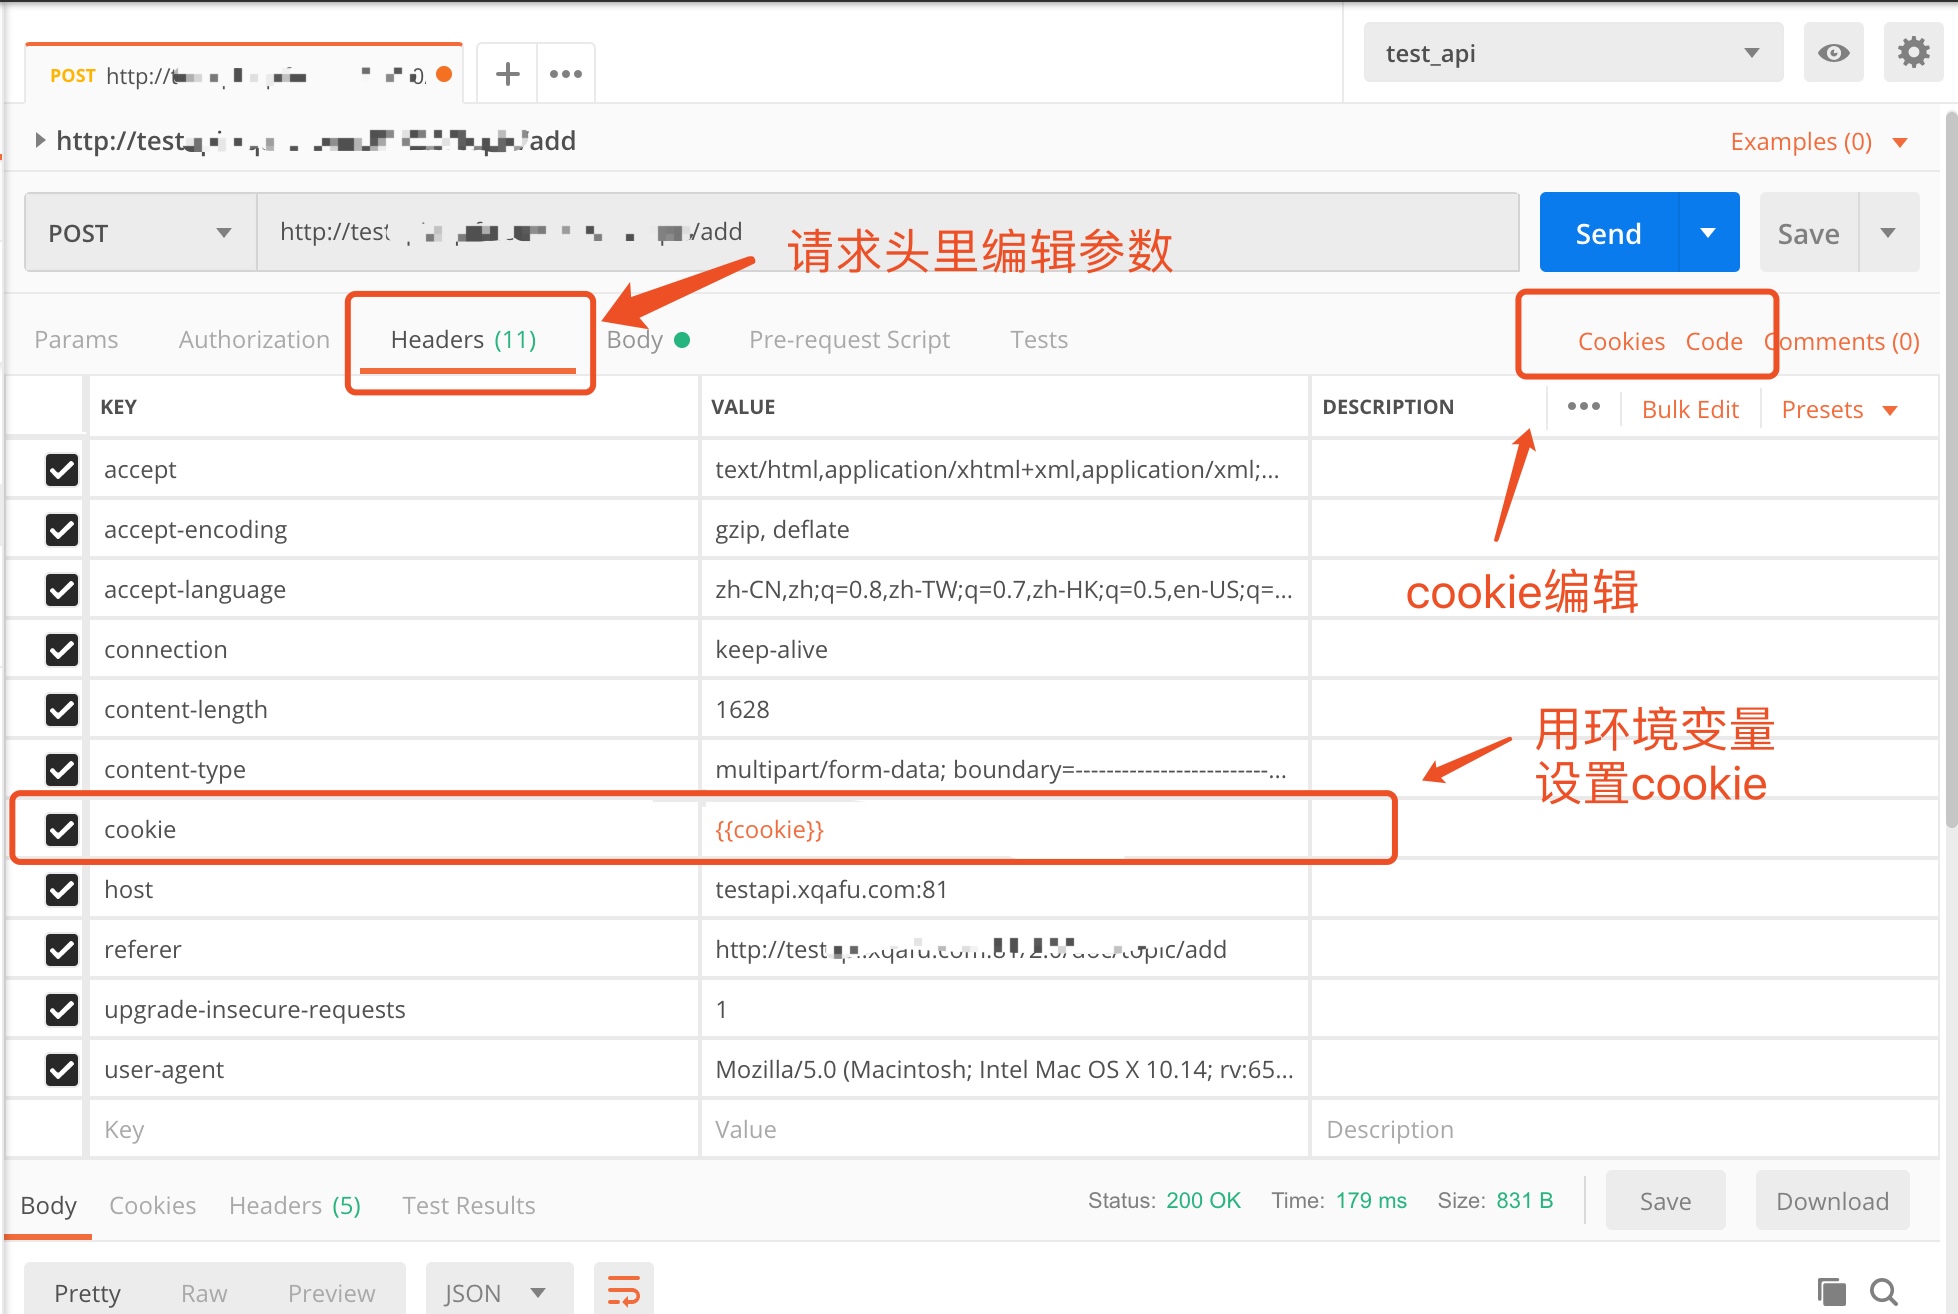
点击cookies 然后就可以进入 (编辑 添加 修改)cookie管理器了

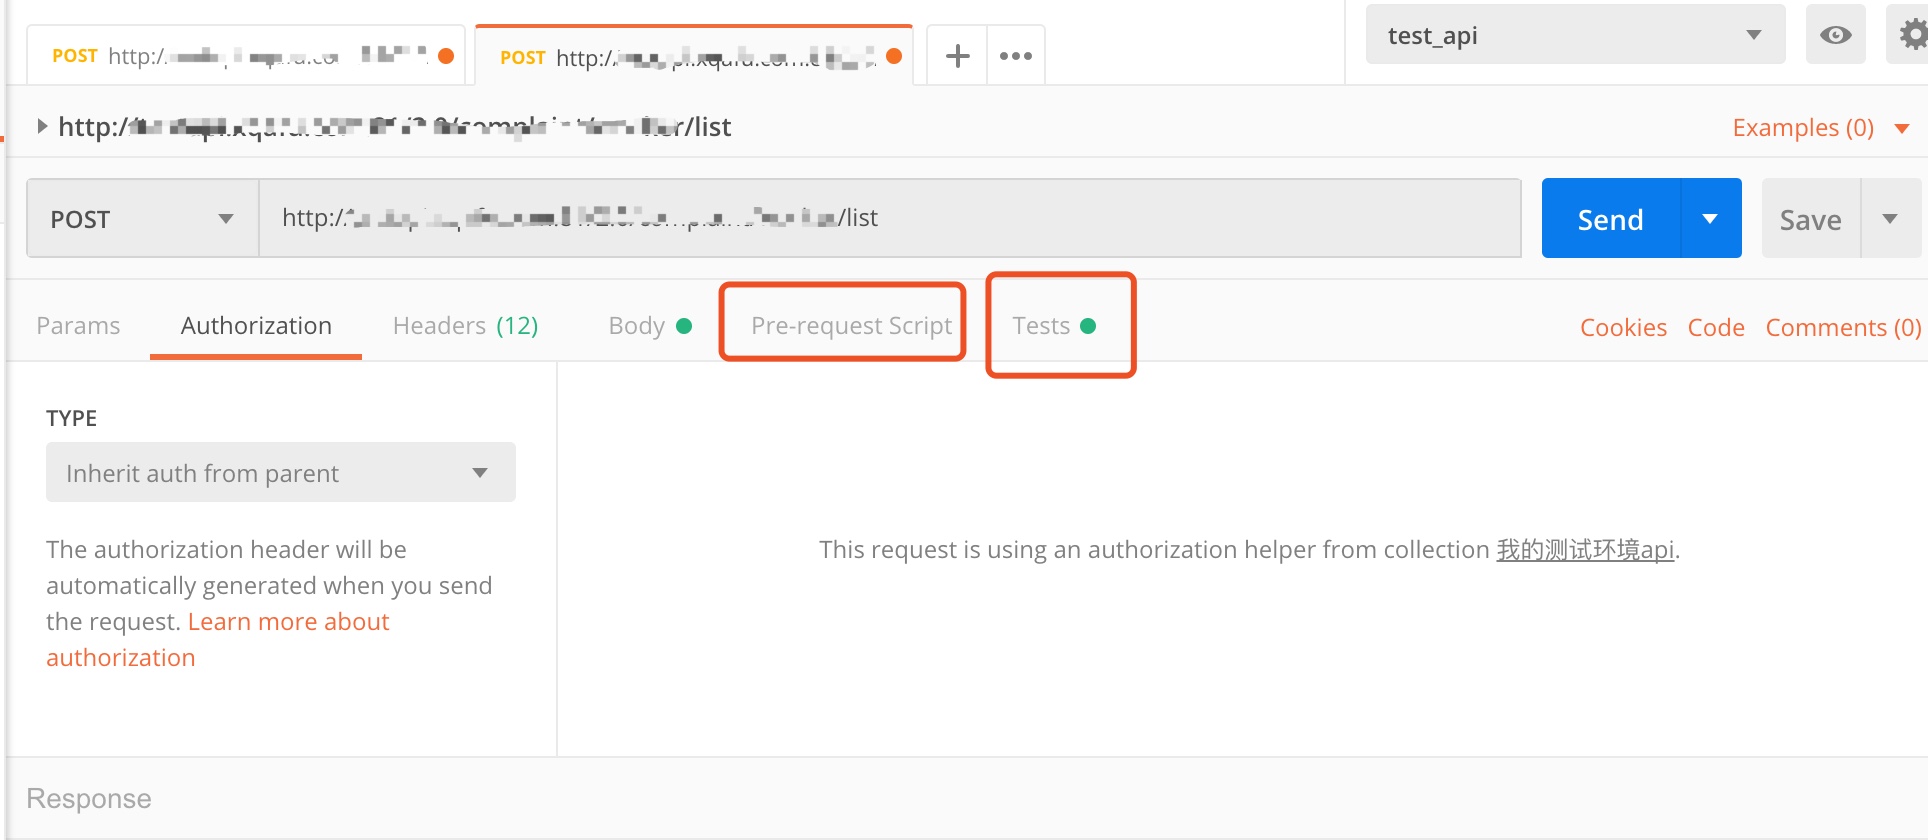
8 脚本执行 ⇡
在发送请求前我们可以编写脚本来更进一步满足我们测试需求
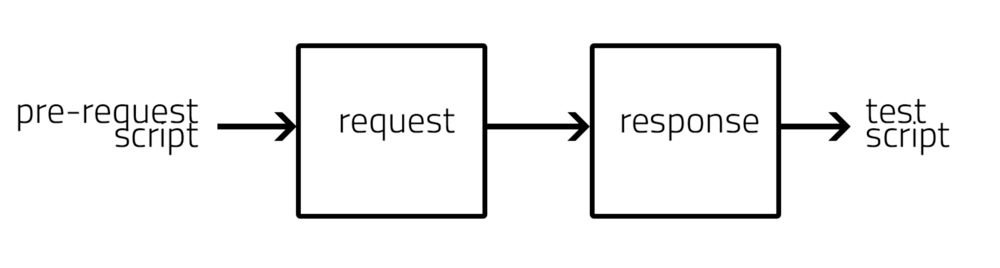
脚本的执行顺序如下图
pre-request脚本,是在对API进行请求之前的脚本,一般用于动态生成参数、JSON数据包、链接地址等。
test脚本,其实更应该叫post-request,实在完成API访问并得到其response回应之后运行的脚本,一般用于获取response的内容,用于之后对于别的资源的请求,如获取页面标题和内容等。
示例:用环境变量实现简单的链式请求
通常我们需要测试一组网络网络请求假设B请求的参数需要从A请求结果获取
首先我们创建一个环境变量 userid 然后在A请求的Tests脚本里添加一段代码 把网络请求的结果data.result.worker_id
赋值给环境变量userid
var data = JSON.parse(responseBody);pm.environment.set("userid",data.result.worker_id);
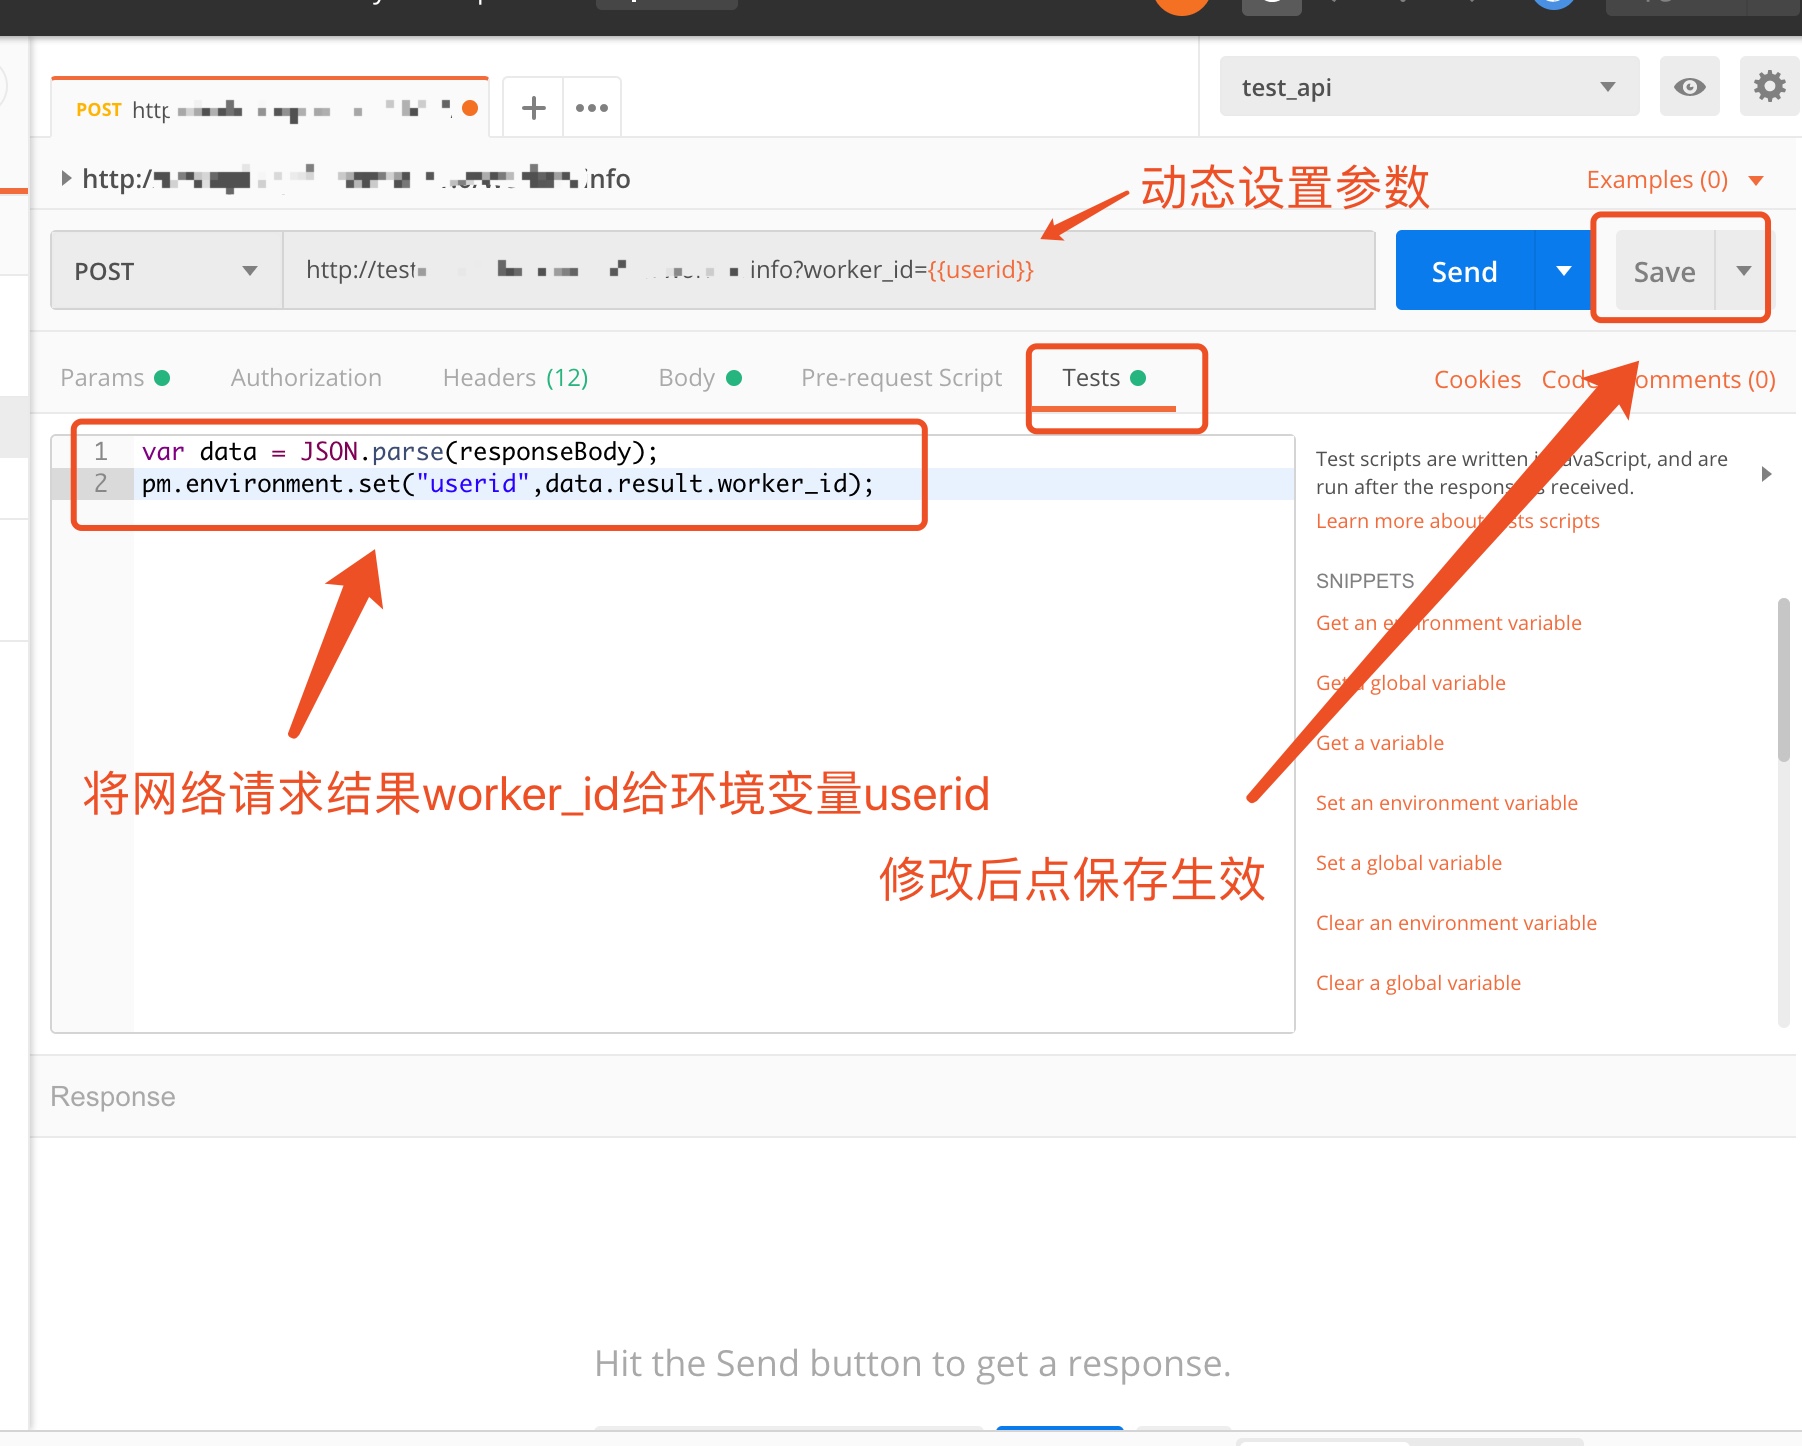
在另外请求里把新赋值的环境变量作为参数传给请求B
示例:用断言判断api的返回数据是否正确
我们的请求通常会返回status来告诉前端api没有任何权限错误,满足我们的期待。
格式如下
{"status": "success","result": []}
我们可以在Tests里面加入断言代码加入这样符合我们期待代码
pm.test("Body matches string", function () {pm.expect(responseBody).to.include("\"status\":\"success\"");});
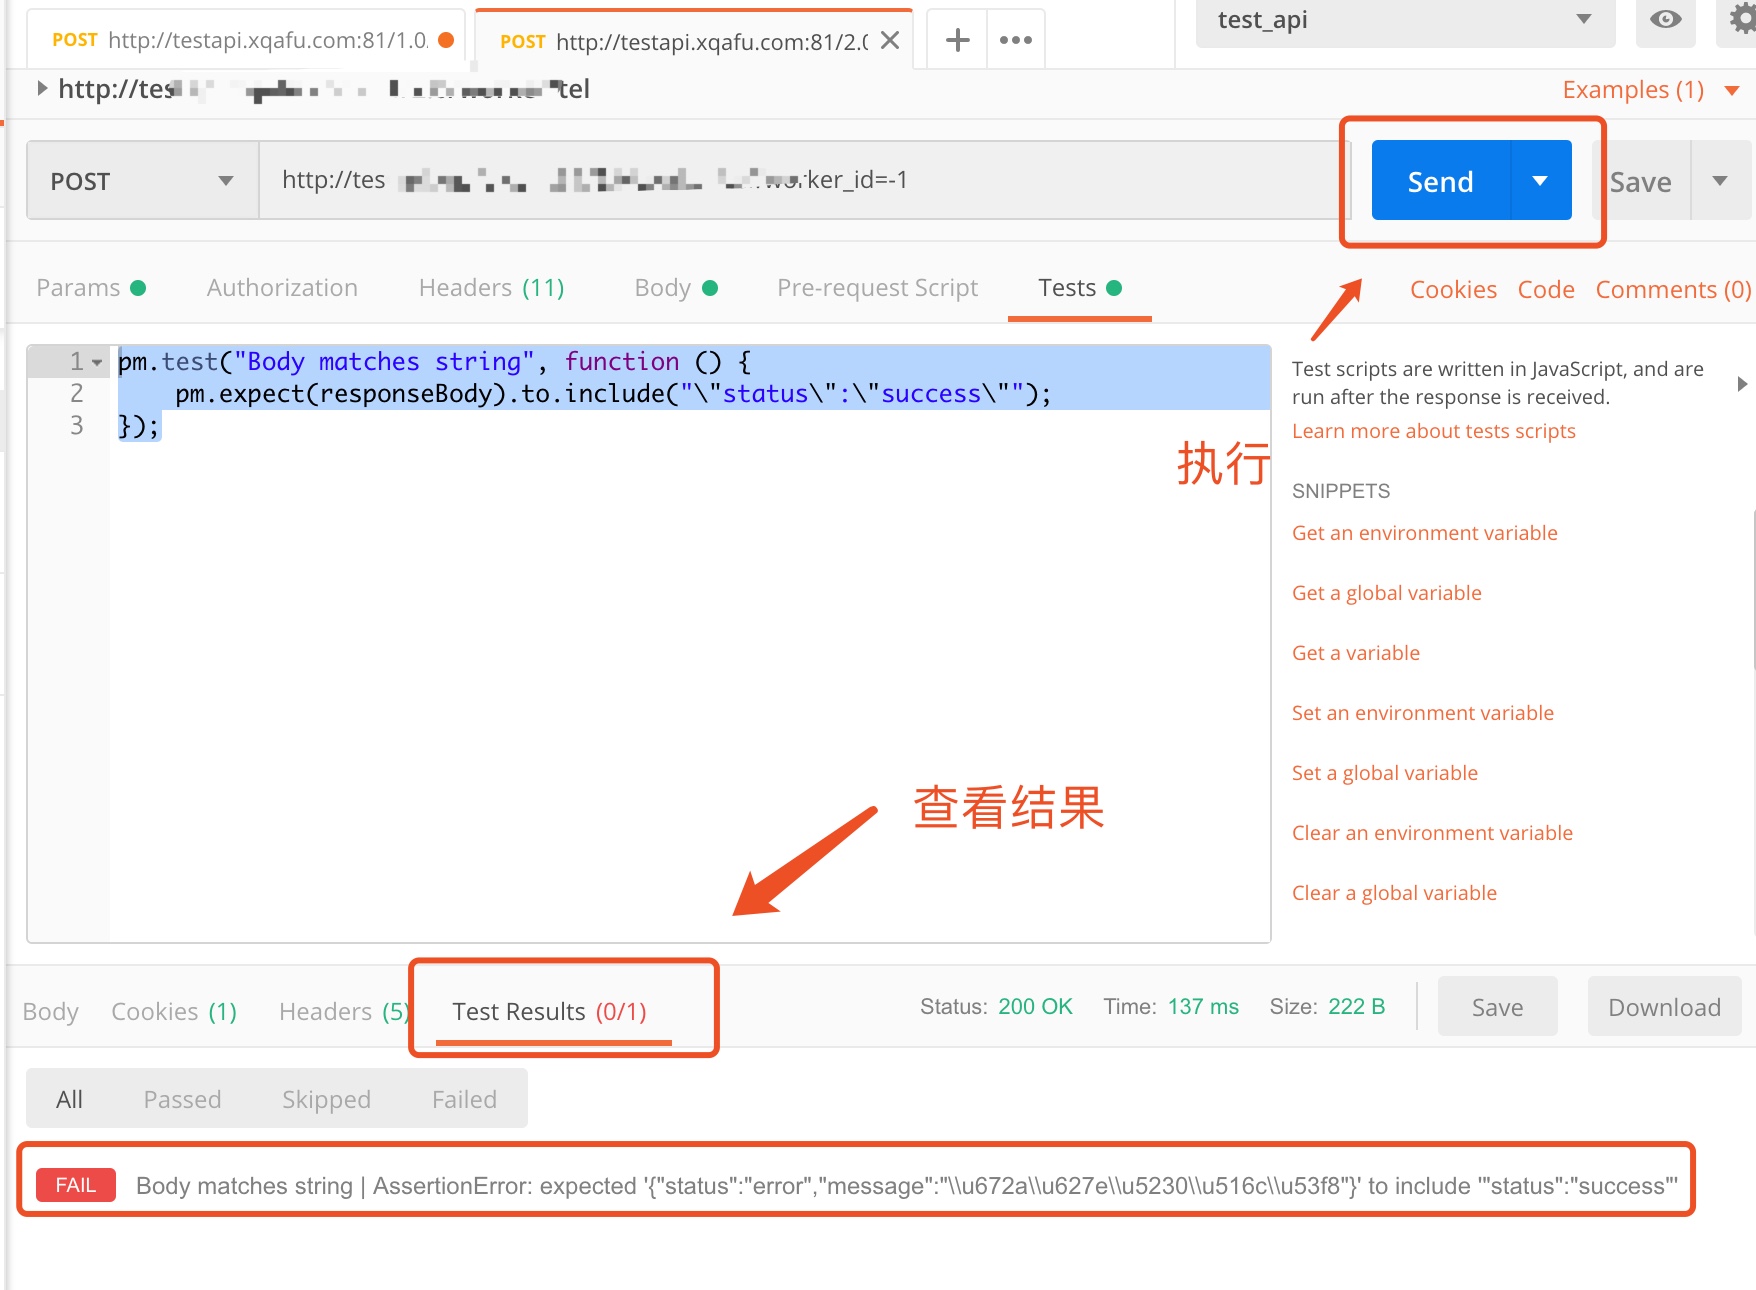
这样我们就能看到清晰的看到测试结果了
8.常用脚本语法⇡
官方学习文档:https://learning.getpostman.com/docs/postman/scripts/test_examples/
- 设置环境变量
pm.environment.set("variable_key", "variable_value");
- 将嵌套对象设置为环境变量
var array = [1, 2, 3, 4];
pm.environment.set("array", JSON.stringify(array, null, 2));
var obj = { a: [1, 2, 3, 4], b: { c: 'val' } };
pm.environment.set("obj", JSON.stringify(obj));
- 获取环境变量
- //如果数据来自未知源,则应将这些语句包装在try catch块中。
var array=json.parse(pm.environment.get(“array”));
var obj=json.parse(pm.environment.get(“obj”));
pm.environment.get("variable_key");
- 清除一个环境变量
pm.environment.unset("variable_key");
- 设置一个全局变量
pm.globals.set("variable_key", "variable_value");
- 清除一个全局变量
pm.globals.unset("variable_key");
- 获取一个变量(此函数搜索全局变量或环境中的变量)
pm.variables.get("variable_key");
- 检查响应正文是否包含字符串
pm.test("Body matches string", function () {
pm.expect(pm.response.text()).to.include("string_you_want_to_search");
});
- 检查响应主体是否等于字符串
pm.test("Body is correct", function () {
pm.response.to.have.body("response_body_string");
});
- 检查JSON值
pm.test("Your test name", function () {
var jsonData = pm.response.json();
pm.expect(jsonData.value).to.eql(100);
});
- 存在的内容类型
pm.test("Content-Type is present", function () {
pm.response.to.have.header("Content-Type");
});
- 响应时间小于200毫秒
pm.test("Response time is less than 200ms", function () {
pm.expect(pm.response.responseTime).to.be.below(200);
});
- 状态值 = 200
pm.test("Status code is 200", function () {
pm.response.to.have.status(200);
});
- 代码名包含字符串
pm.test("Status code name has string", function () {
pm.response.to.have.status("Created");
});
- ost请求状态代码是否成功 (是否满足指定code状态)
pm.test("Successful POST request", function () {
pm.expect(pm.response.code).to.be.oneOf([201,202]);
});
- 对JSON数据使用tinyvalidator (验证数组内各个数据是否同为boolean类型)
var schema = {
"items": {
"type": "boolean"
}
};
var data1 = [true, false];
var data2 = [true, 123];
pm.test('Schema is valid', function() {
pm.expect(tv4.validate(data1, schema)).to.be.true;
pm.expect(tv4.validate(data2, schema)).to.be.true;
});
- json规则验证 (断言alpha类型)
var Ajv = require('ajv'),
ajv = new Ajv({logger: console}),
schema = {
"properties": {
"alpha": {
"type": "boolean"
}
}
};
pm.test('Schema is valid', function() {
pm.expect(ajv.validate(schema, {alpha: true})).to.be.true;
pm.expect(ajv.validate(schema, {alpha: 123})).to.be.false;
});
- 解码base64编码数据
var intermediate,
base64Content, // assume this has a base64 encoded value
rawContent = base64Content.slice('data:application/octet-stream;base64,'.length);
intermediate = CryptoJS.enc.Base64.parse(base64content);
// CryptoJS is an inbuilt object,documented here: https://www.npmjs.com/package/crypto-js
pm.test('Contents are valid', function() {
pm.expect(CryptoJS.enc.Utf8.stringify(intermediate)).to.be.true; // a check for non-emptiness
});
- 发送异步请求 (此函数既可用作预请求脚本,也可用作测试脚本。)
pm.sendRequest("https://postman-echo.com/get", function (err, response) {
console.log(response.json());
});
- 将XML正文转换为JSON对象
var jsonObject = xml2Json(responseBody);
10.postman命令行自动化测试⇡
详情可参考官方文档 https://learning.getpostman.com/docs/postman/collection_runs/command_line_integration_with_newman
Newman 是Postman命令行集合管理器,它允许您从命令行运行和测试postman集合.
这样你就可以轻松的将它与持续集成服务器与构建系统集成在一起.
Newman与Postman功能是对等的,并允许你按照postman应用程序的收款运行程序执行收款方式来运行收款
Newman在NPM和github上注册
我们将介绍这些主题来学习与Newman的命令行集成
- 入门
- 选项
- 失败测试的示例集合
- 文件上传
- 编程库
- 自定义报告
入门
Newman是在node.js上构建的,要运行newman,请确保已安装node.js。
您可以在Linux,windows和Mac OSX上下载和安装node.js
安装node.js之后,newman只是一个命令。在您的系统上全局安装来自Npm的Newman,就可以在任何地方运行它
$ npm install -g newman
运行newman最简单的是使用集合运行它。您可以从文件系统运行任何收集文件。
要了解如何将集合导出为文件共享,请参阅集合文档。
https://learning.getpostman.com/docs/postman/collections/sharing_collections
$ newman run mycollection.json
您还可以将集合作为URL传递。有关详细信息,请参阅集合文档以了解如何将文件作为URL共享。https://learning.getpostman.com/docs/postman/collections/sharing_collections
您的集合可能使用环境变量。要提供一组随附的环境变量,请从postman导出模板并使用-e标志运行它们。https://learning.getpostman.com/docs/postman/environments_and_globals/manage_environments
$ newman run https://www.getpostman.com/collections/cb208e7e64056f5294e5 -e dev_environment.json
选项
Newman提供一组丰富的选项来定制运行.您可以通过使用-h标志运行它来检索选项列表
$ newman run -h
选项:
通用:
-h,--help 输出使用信息
-v,--version 输出版本号
基础步骤:
--folder [folderName] 指定要从集合运行的单个文件夹。
-e,-environment[file_url] 指定postman环境 如json[file]
-d、--data[file] 指定data文件,json或csv的数据文件
-g,-globals[文件]将postman 指定globals文件为json[文件]
-n,-iteration count[number] 定义要运行的迭代次数
请求选项:
--delay-request[number] 指定请求[number]之间的延迟(毫秒)
--timeout-request[number] 指定请求超时(毫秒)
杂项:
--bail 测试用例失败时,停止执行
--silent 关闭终端输出
--no-color 禁用彩色输出
-K,——insecure 禁用严格的SSL
-x,-suppress exit code 继续运行测试,即使失败,但退出时code=0
--ignore-redirects 禁用3xx响应的自动跟踪
使用-n选项设置运行集合的迭代次数。
$ newman run mycollection.json -n 10 # runs the collection 10 times
要为每个迭代提供不同的数据集,例如变量,可以使用-d指定JSON或CSV文件。
例如,如下所示的数据文件运行两次迭代,每次迭代使用一组变量。
[{"url": "http://127.0.0.1:5000","user_id": "1","id": "1","token_id": "123123",},{"url": "http://postman-echo.com","user_id": "2","id": "2","token_id": "899899",}]
$ newman run mycollection.json -d data.json
下面是上述变量集的csv文件示例:
url, user_id, id, token_idhttp://127.0.0.1:5000, 1, 1, 123123123http://postman-echo.com, 2, 2, 899899
默认情况下,如果一切正常(如无任何异常),则Newman退出,状态代码为0。
持续集成工具响应这些退出代码,并相应地通过或失败一个构建。
您可以使用--bail标志来告诉newman在一个状态代码为1的测试用例错误时停止,然后由CI工具或构建系统获取该错误。
$ newman run PostmanCollection.json -e environment.json --bail newman
失败测试的示例集合
→ Status Code Test
  GET https://echo.getpostman.com/status/404 [404 Not Found, 534B, 1551ms]
  1\. response code is 200

┌─────────────────────────┬──────────┬──────────┐
│                         │ executed │   failed │
├─────────────────────────┼──────────┼──────────┤
│              iterations │        1 │        0 │
├─────────────────────────┼──────────┼──────────┤
│                requests │        1 │        0 │
├─────────────────────────┼──────────┼──────────┤
│            test-scripts │        1 │        0 │
├─────────────────────────┼──────────┼──────────┤
│      prerequest-scripts │        0 │        0 │
├─────────────────────────┼──────────┼──────────┤
│              assertions │        1 │        1 │
├─────────────────────────┴──────────┴──────────┤
│ total run duration: 1917ms                    │
├───────────────────────────────────────────────┤
│ total data received: 14B (approx)             │
├───────────────────────────────────────────────┤
│ average response time: 1411ms                 │
└───────────────────────────────────────────────┘

  #  failure        detail

 1\.  AssertionFai…  response code is 200
                    at assertion:1 in test-script
                    inside "Status Code Test" of "Example Collection with
                    Failing Tests"
所有测试和请求的结果都可以导出到一个文件中,然后导入到postman中进行进一步分析。使用JSON报告器和文件名将运行程序输出保存到文件中。
$ newman run mycollection.json --reporters cli,json --reporter-json-export outputfile.json
文件上传
Newman还支持文件上传。若要使此操作正确,请将上传文件在集合中指定的相对位置。例如,查看此集合:
{"variables": [],"info": {"name": "file-upload","_postman_id": "9dbfcf22-fdf4-f328-e440-95dbd8e4cfbb","description": "A set of `POST` requests to upload files as form data fields","schema": "https://schema.getpostman.com/json/collection/v2.0.0/collection.json"},"item": [{"name": "Form data upload","event": [{"listen": "test","script": {"type": "text/javascript","exec": ["var response = JSON.parse(responseBody).files[\"sample-file.txt\"];","","tests[\"Status code is 200\"] = responseCode.code === 200;","tests[\"File was uploaded correctly\"] = /^data:application\\/octet-stream;base64/.test(response);",""]}}],"request": {"url": "https://echo.getpostman.com/post","method": "POST","header": [],"body": {"mode": "formdata","formdata": [{"key": "file","type": "file","enabled": true,"src": "sample-file.txt"}]},"description": "Uploads a file as a form data field to `https://echo.getpostman.com/post` via a `POST` request."},"response": []}]}
sample-file.txt文件必须与集合位于同一目录中。照常运行此集合。
$ newman run file-upload.postman_collection.json
编程库
Newman从一开始就是编程库。它可以扩展并以各种方式使用。您可以在node.js代码中使用它,如下所示:
var newman = require('newman'); // require newman in your project// call newman.run to pass `options` object and wait for callbacknewman.run({collection: require('./sample-collection.json'),reporters: 'cli'}, function (err) {if (err) { throw err; }console.log('collection run complete!');});
自定义报告
当人们想要生成适合于非常具体的用例的收集运行报告时,定制的报告器就派上用场了。例如,当请求(或它的测试)失败时注销响应主体,等等。比如使用html插件
比如则需要执行命令
$npm install -g newman-reporter-html来全局安装支持Newman生成html报告的组件
然后,执行命令
$ newman run API.postman_collection.json -d data.json -r html
建立自定义报告
自定义报告程序是一个节点模块,其名称形式为newman reporter-
- 导航到您选择的目录,并使用npm init创建一个空白的npm包。
- 添加index.js文件,该文件导出以下表单的函数:
function (emitter, reporterOptions, collectionRunOptions) {// emitter is is an event emitter that triggers the following events: https://github.com/postmanlabs/newman#newmanrunevents// reporterOptions is an object of the reporter specific options. See usage examples below for more details.// collectionRunOptions is an object of all the collection run options: https://github.com/postmanlabs/newman#newmanrunoptions-object--callback-function--run-eventemitter};
- 使用NPM Publish发布报告程序,或在本地使用报告程序,请参阅使用说明。
https://github.com/postmanlabs/newman#configuring-reporters
还支持范围报告程序包名称,如@myorg/newman reporter-
https://github.com/postmanlabs/newman/tree/develop/lib/reporters
使用自定义报告
要使用自定义报告程序,必须先安装它。例如,要使用Newman Teamcity Reporter:
安装报告程序包。https://www.npmjs.com/package/newman-reporter-teamcity
$ npm install newman-reporter-teamcity
请注意,包的名称的格式为newman reporter-
要使用本地(未发布)报告程序,请运行命令npm install<path/to/local reporter directory>
通过CLI或以编程方式使用已安装的报告程序。在这里,在选项中指定报告者名称时,不需要Newman报告者前缀。
作用域报告程序包必须用作用域前缀指定。例如,如果您的包名称是@myorg/newman reporter name,则必须使用@myorg/name指定报告者。
CLI:
newman run /path/to/collection.json -r myreporter --reporter-myreporter-
# The option is optional
以编程方式:
var newman = require('newman');newman.run({collection: '/path/to/collection.json',reporters: 'myreporter',reporter: {myreporter: {'option-name': 'option-value' // this is optional}}}, function (err, summary) {if (err) { throw err; }console.info('collection run complete!');});
在上述两种情况下,报告者选项都是可选的。
有关详细信息的完整列表,请参阅Newman自述文件。
https://github.com/postmanlabs/newman